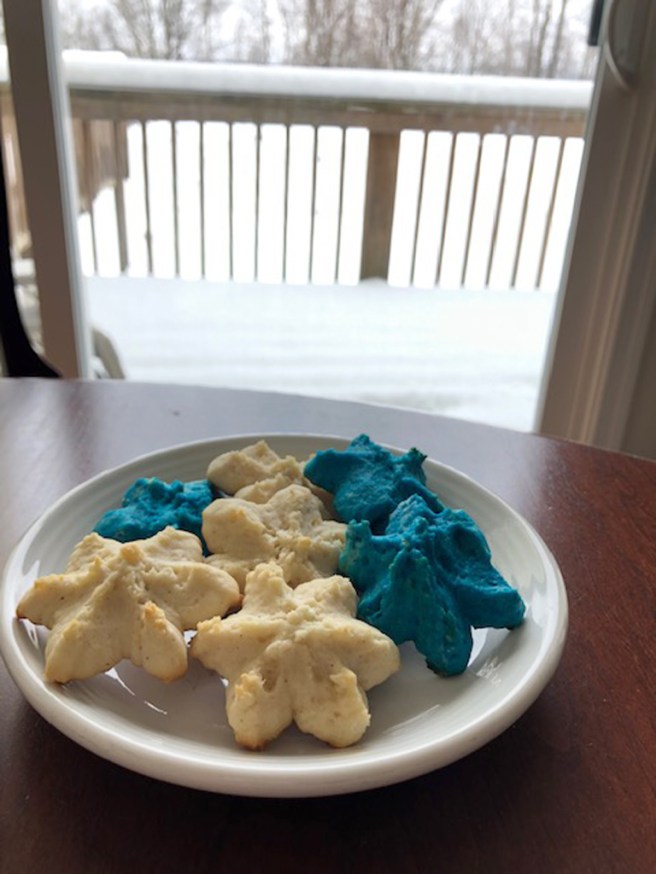
Butter Snowflakes
This weather….
One moment it’s -2 degrees and 3 days later it’s 60 degrees. Then a couple days later it’s going to flood and then winter will be back again.
Climate change? Call it what you will, but this type of weather is the reason why I no longer store my summer clothes anymore..LOL!
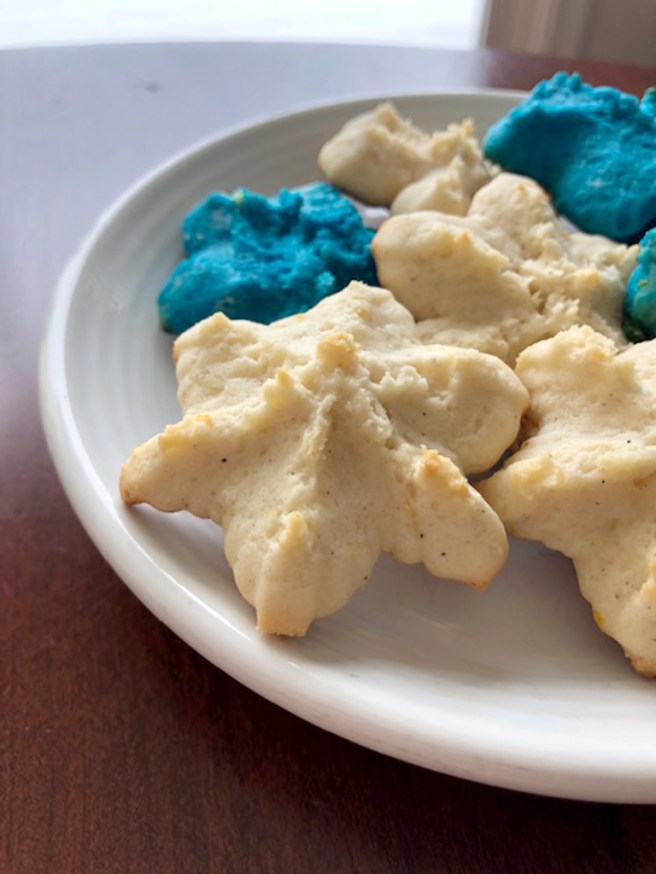
During the polar vortex a lot of us had at the beginning of last month, I decided to dig out the cookie press and make these butter snowflakes in honor of our first big snowfall of the season.
A couple things I’ve learned about using the cookie press: It’s easy to use, it’s fun to use, but the downfall is you have to wait until your cookie sheet(s) cool completely before pumping out more dough onto it or the dough will not stick to it! Honestly, I only used the cookie press once, so using it was a learning process.
The cookies came out nicely, except for a few, but again, I’m learning. I even used blue food coloring to a few of the cookies to make them a little more fun. I did a couple shapes as well.
If you don’t have a cookie press, don’t worry! You can find one here and here, or just drop a small amount of dough onto the cookie sheet and sprinkle some sanding sugar on top.
BUTTER SNOWFLAKES
Makes about 6 dozen
2 1/4 cups all purpose flour
1/4 teaspoon salt
1/4 teaspoon ground cinnamon
1 cup softened margarine
1 (3 oz) pkg. softened cream cheese
1 cup granulated sugar
1 egg yolk
1 teaspoon vanilla extract
1 teaspoon orange zest
• Preheat oven to 350ºF.
• In a medium-sized bowl, sift together flour, salt and cinnamon; set aside.
• In a mixer bowl with paddle attachment, cream together margarine and cream cheese. Add sugar and egg yolk; continue to mix together until light and fluffy. Stir in vanilla extract and orange zest.
• Gradually blend in dry ingredients.
• Fill a cookie press with dough and form cookies onto unprepared and cool cookie sheets.
• Bake 12-15 minutes in preheated oven until cookies are golden brown on the peaks and on the bottoms. Remove from the oven to cool on wire racks. Be sure to allow time for cookie sheets to cool before pressing more cookies onto them.
Blueberry Oatmeal Crumble Bars

And I’m back!
Yes, I’ve been quiet. The holidays and a slightly changed schedule to my weeks have been crazy. I’ve been enjoying this beautiful thing called sleep. Now that Mike is no longer working night shift (He started a new job last month..yay!!) he and I have been going to bed shortly after putting Alex to bed. After having a big order of cookies over the holidays, I haven’t baked much of anything, except Alex’s birthday cake. I made this cake, but with red buttercream frosting since that was what the birthday girl requested.
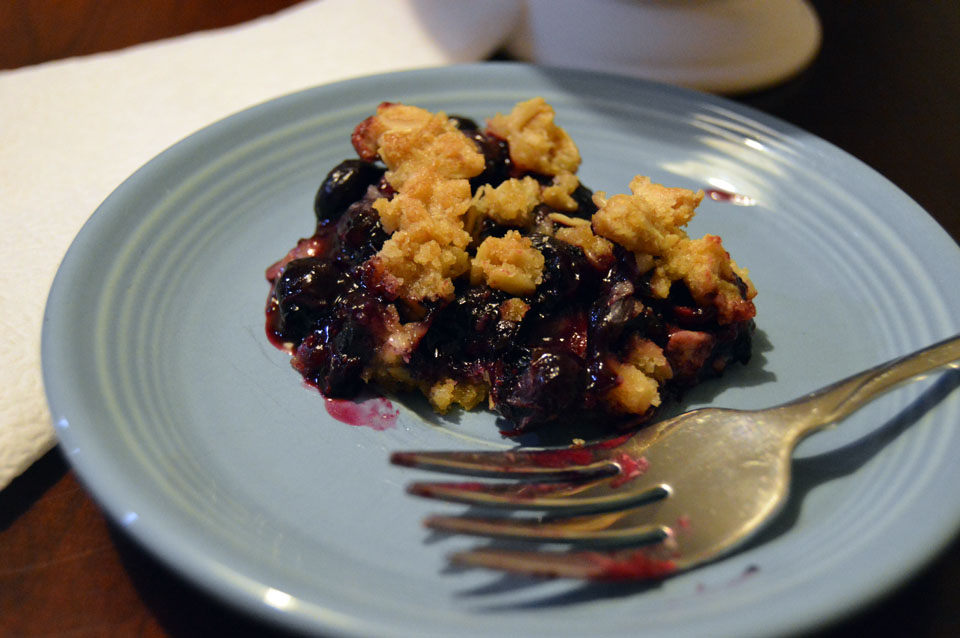
The holidays, the birthdays and the school break are all over, so now it’s time to hop back into it and start this machine up again. One of my new year’s resolutions is to keep a baking schedule and include recipes I’ve found and tried online and in my books, like these blueberry oatmeal crumble bars, for example.
Alex looooooves blueberries. I had to hide them so I could make this recipe! I found it on Pinterest, from Averie Cooks. Slightly altered, I not only used fresh blueberries, but I used freshly squeezed juice from a navel orange instead of a lemon. Besides, I didn’t have one. Averie used frozen blueberries which required her to bake 55 minutes. I only baked for 45, but I also made sure the crumble topping wasn’t getting too brown. This is a great after-dinner dessert, or heck have a bit of it for breakfast!
BLUEBERRY OATMEAL CRUMBLE BARS
Slightly adapted from Averie Cooks
Crumble Topping:
1/2 cup margarine, melted
1 cup all-purpose flour
3/4 cup old-fashioned oats
1/2 cup light brown sugar (I only have dark brown sugar, but it works just as well!)
Blueberry Filling:
1 pint blueberries, fresh or frozen
1/3 cup granulated sugar
2 tablespoons juice from a navel orange
2 teaspoons cornstarch
• Preheat oven to 350-degrees. Cover an 8-inch square baking pan with aluminum foil and spray with cooking spray. This allows for easier cleanup at the end!
• Melt the margarine in a large microwaveable bowl for 1 minute.
• Mix in rest of the crumble topping ingredients until all mixed and lumpy. Scoop a cup of the mixture and set aside.
• Take the rest of the crumble mixture and pat it down on the bottom of the baking pan, all the way to the corners. Set aside.
• In the same large bowl, combine all the blueberry ingredients and pour into the baking pan.
• Take the reserved crumble topping and sprinkle all over the top of the blueberries.
• Bake for 55 minutes (if using frozen blueberries) or 45 minutes (using fresh blueberries) until crumble topping is a golden brown color.
• Cool completely on a wire rack. Cut into squares.
Double-Layer Pumpkin Cheesecake
A lot of you may be enjoying the pumpkin spice everything craze so much that you would drown yourself in it. My husband is one of those people. Mike would go for this madness year-round if he could. Our house smells like pumpkin spice; his car does, too. I’m surprised his skin hasn’t turned a pumpkin orange by now! Maybe not that extreme, but he does consume pumpkin spice whatever on the regular until it’s officially over.
As for myself, I never really had a 100% love for pumpkin spice, but I do like it, especially the smell. I’m more of an apple cinnamon kinda gal. It makes me believe that my sometimes dissatisfaction with pumpkin flavor has contributed to my not-being-100%-crazy-for pumpkin spice everything. BUT if pumpkin pie is brought up a notch, like being a cheesecake instead, yeah, I’ll drown myself in it!
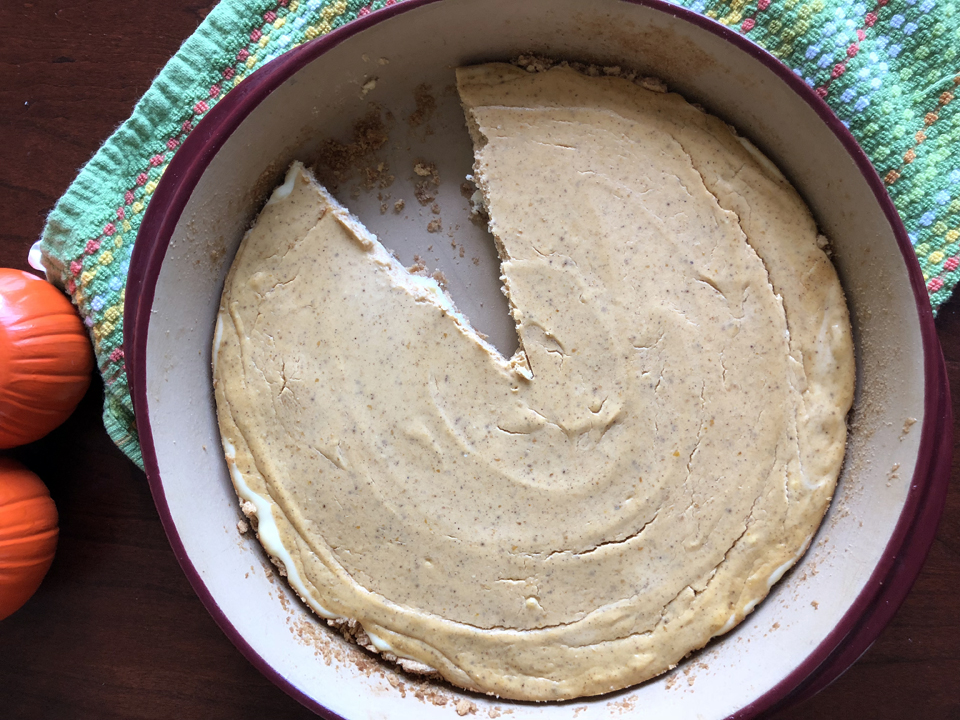
I honestly cannot remember where this recipe had come from. Maybe from my mom, or she got it from someone else, but this is one of those pumpkin recipes that I enjoy way more than traditional pumpkin pie. This is a great dessert for all your fall gatherings, especially Thanksgiving, and year-round, too. I think the next time I make this I’m going to double the recipe to make it thicker, or use a smaller baking dish. Doing so may require time adjustments to the baking, so if you do use a smaller dish, keep an eye on it so you don’t dry it out or burn it!
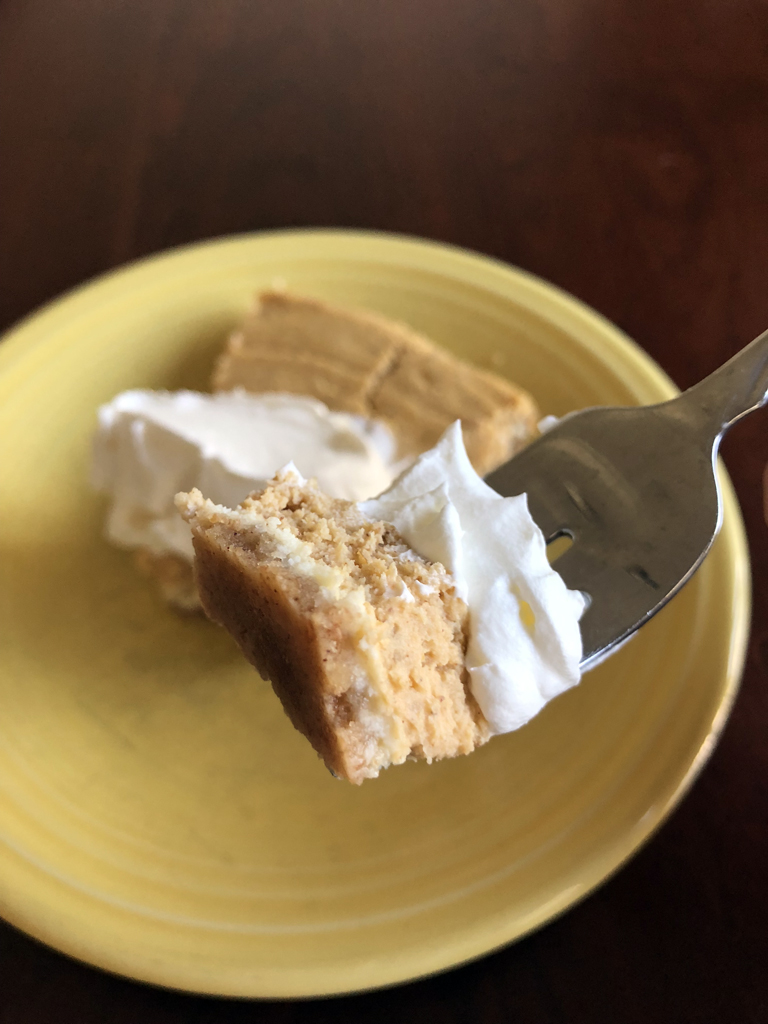
And don’t forget the Cool Whip or whipped cream!
DOUBLE-LAYER PUMPKIN CHEESECAKE
2 packages (8 oz. each) softened cream cheese
½ cup granulated sugar
½ teaspoon vanilla extract
2 eggs
½ cup canned pumpkin
½ teaspoon ground cinnamon
Dash each of ground cloves and nutmeg
1 ½ to 2 cups graham cracker crumbs (About 15-20 crackers crushed)
5 tablespoons melted margarine
½ cup Cool Whip
Preheat oven to 325 degrees and spray the bottom and side of 8-inch spring form pan or pie plate.
Crush graham crackers and pour into a small or medium bowl; melt margarine and mix in with graham cracker crumbs until crumbs are completely moistened. Pour crumb mixture into prepared pan and press gently to completely cover the bottom of the pan to its sides.
In a large mixing bowl, combine softened cream cheese, sugar and vanilla.
Add in the eggs; do not over mix!
Remove half of the batter to another large bowl, and add the canned pumpkin and spices.
Pour the cream cheese batter into the prepared pan first; spread to sides. Then pour the pumpkin batter over top; spread to sides.
Bake for 35-40 minutes until the center is set. Place a toothpick in the center of the cheesecake. If toothpick comes out clean, it is set. If not, place the cheesecake back in the oven for another 5 minutes.
Cool cheesecake and refrigerate for 3 hours or overnight until ready to serve. Use Cool Whip or whipped cream for topping.
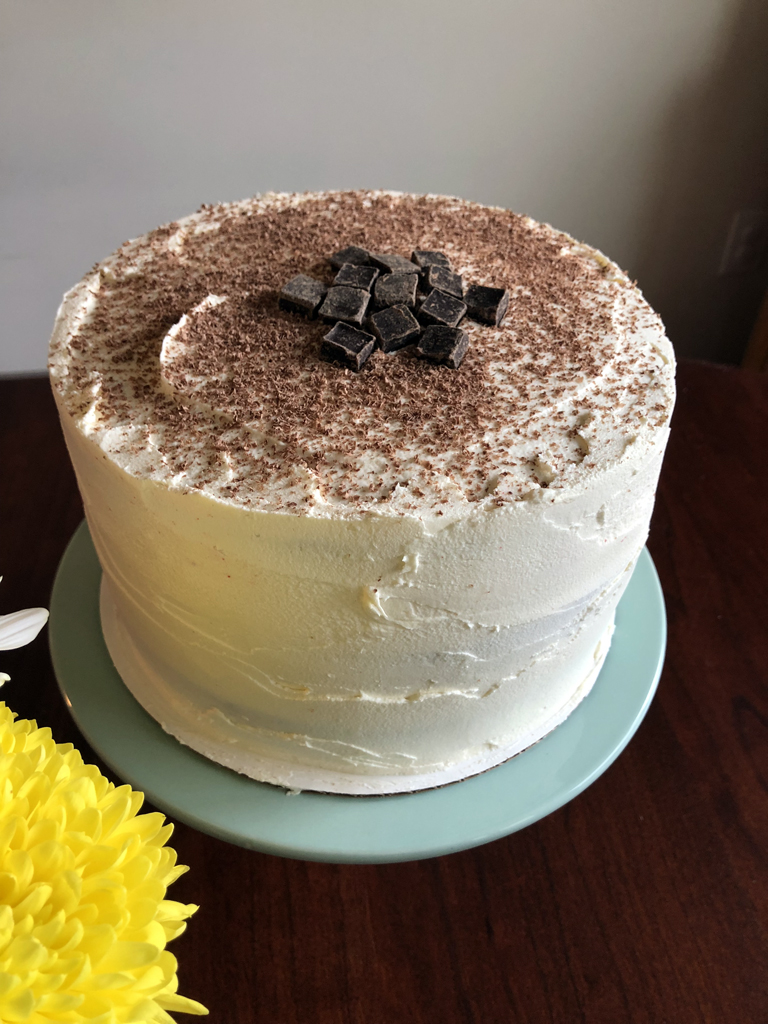
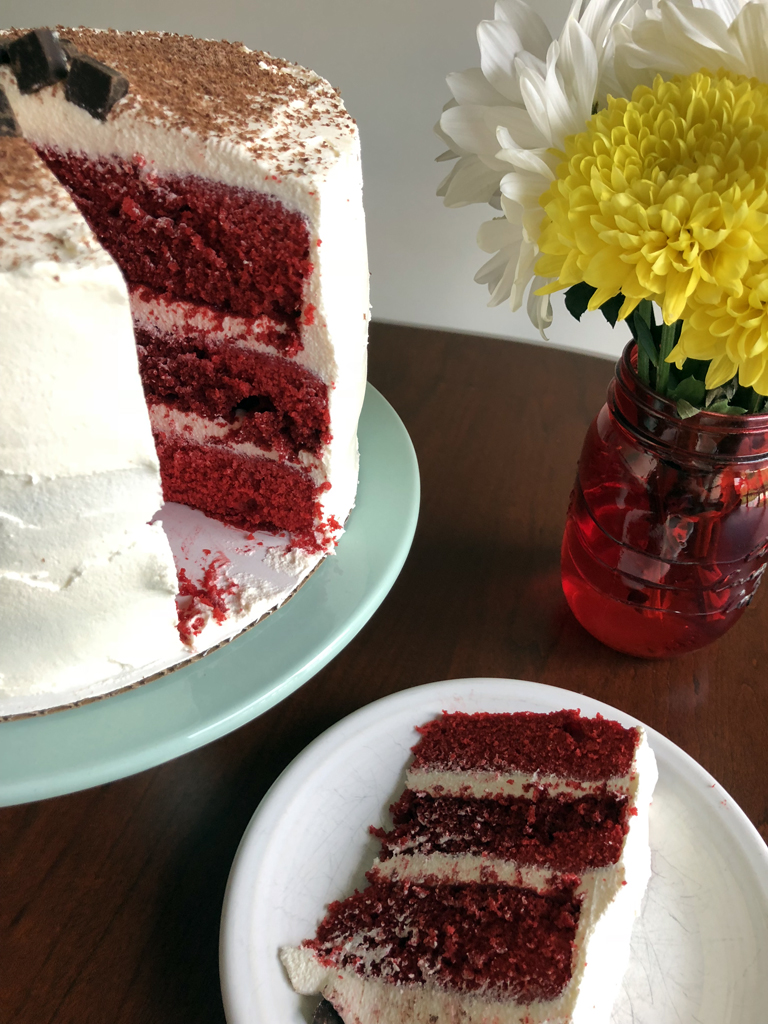
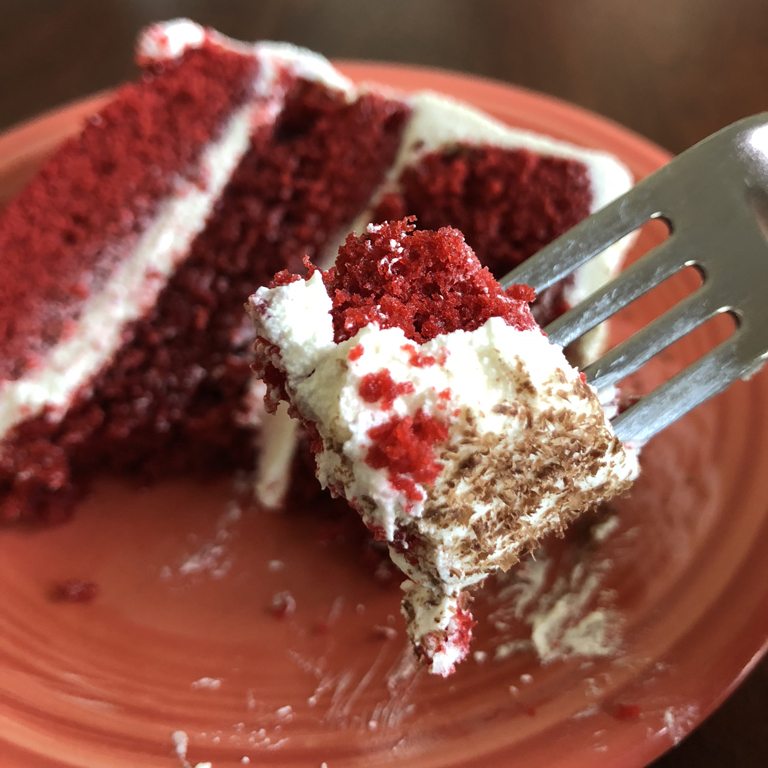
Red Velvet Cake with White Chocolate Cream Cheese Frosting
My last post was for those who don’t like cake. This one is for those who do!
I made this red velvet cake with white chocolate cream cheese frosting, because why not! I’ve been jonesing for a red velvet cake anyway.
My absence on here was unexpectedly long since I’ve been enjoying the outdoors and entertaining Alex with summer activities while Mike has been busy with work and his bands. Yes, he’s in another band playing bass, so more practices and shows are on the schedule. Plus I’ve been glued to the TV every evening watching Le Tour de France last month, a sport I got hooked on 11 years ago. Life stops (and so does the housework….well, maybe not quite!) when July comes around just so I can sack out on the couch, eat popcorn or cereal and watch dudes climb the French Alps and sprint their butts off.
Alright, back to this cake…

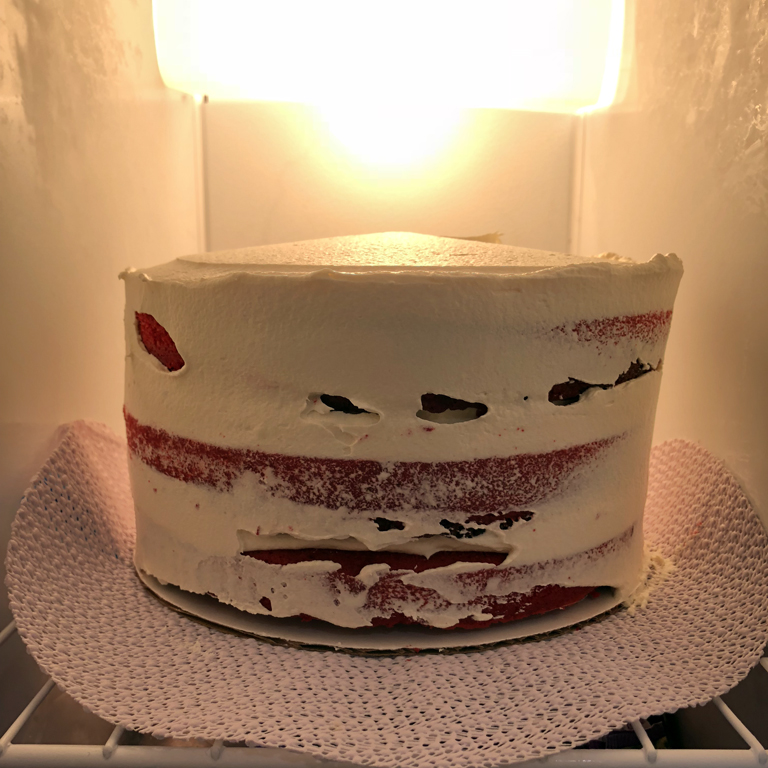
Years ago when I made my first red velvet cake for a wedding anniversary dinner it turned out…okay-ish. It was back when I was still dealing with my mother’s cake curse where it would collapse while decorating it, or it would crack right down the middle after it cooled. It’s also my first 3-layered cake, and I was afraid that it was too tall for me to handle. Nowadays I’ve learned a good bit on how to make a successful cake, from tiered cakes to frosting methods. One of the secrets to a successful cake is refrigeration!! Once you frost and pile on the layers, you do what’s called a crumb-coat. You spread a little bit of frosting around the sides of your cake, then freeze for about a half hour before you finish with the final coat. It’s like a naked cake. If you want to stop right here, go for it. If not, after a half hour bring your cake back out and spread and smooth on the rest of the frosting. A rotating cake stand is a must and a blessing! I’m not sure how I lived without one for years! I got this and this one too last Christmas. One or both of them are wonderful to have in the kitchen! The one thing I do need to work on is to not use so much frosting in between the layers because I’ll end up not having enough for the outside. Well, I came reeeeeal close and thankfully I had just enough to cover the cake, but not enough to smooth it out.

I gotta say, overall I’m pretty proud about how this cake turned out. I think Mom would be proud, too. Alex is asking for more cakes, so check back often to see some more in the near future! I was even asked to make a cheesecake, so yes, I will definitely make that happen! And maybe, just maybe, with this little perk of confidence, I may think about making cakes for other people again. We shall see!
Happy baking!
RED VELVET CAKE WITH WHITE CHOCOLATE CREAM CHEESE FROSTING
(Yields 1 8-inch cake)
Cake:
1 cup softened margarine
3 cups granulated sugar
6 eggs
1 oz. red food coloring
3 tablespoons unsweetened cocoa powder
3 cups sifted flour
1 cup buttermilk
1 teaspoon vanilla extract
½ teaspoon salt
1 tablespoon distilled white vinegar
1 teaspoon baking soda
Frosting:
2 8-oz. packages of softened cream cheese
1 cup softened margarine
12 oz. of white chocolate, melted
Dark chocolate pieces for garnish, optional
-
Preheat oven to 325 degrees. Spray 3 8-inch round cake pans with non-stick cooking spray.
-
In a large mixing bowl, cream together 1 cup of margarine and sugar. Add eggs one at a time, beating well after each addition. Mix in food coloring and cocoa powder.
-
Add flour alternately with buttermilk. Add vanilla and salt.
-
In a small bowl, mix baking soda with vinegar and gently stir into mixture. Don’t overmix.
-
Divide batter into the prepared cake pans and bake for 25 minutes until toothpick inserted in each cake comes out clean. Allow the cool in pans for about 10-15 minutes before inverting onto wire racks to cool completely.
-
To make the frosting: Melt the white chocolate in a microwaveable dish, heating in 30-40 second intervals, being careful not to brown the chocolate. Allow to cool to lukewarm.
-
In a large bowl, beat the cream cheese until light and fluffy. Gradually beat in melted white chocolate and softened margarine. Beat until it’s the consistency of whipped cream.
-
To assemble cake: Using a rotating cake stand, frost top of 1st layer, then stack on 2nd Frost top of 2nd layer, then stack on 3rd layer. Frost 3rd layer, then smooth out top and sides of cake to create the crumb coat. Carefully place cake in the freezer for 30 minutes. Remove the cake and return to your rotating cake stand. Use rest of the frosting to coat sides of cake until smooth. Decorate cake by shaving pieces of dark chocolate on top of the cake and place several pieces of dark chocolate in the center. Enjoy!
