Cake Mix Cookie Cake

My husband is not a cake eater, but I have seen him eat cake, maybe 4 times in the last 24 years we’ve known each other. In the past whenever his birthday came around I always made a cake for him, but he wouldn‘t eat it, so I either ate it myself or I took it to work. I stopped making him cake a long time ago and started making him his favorite meals, like the lasagna he loves so much.
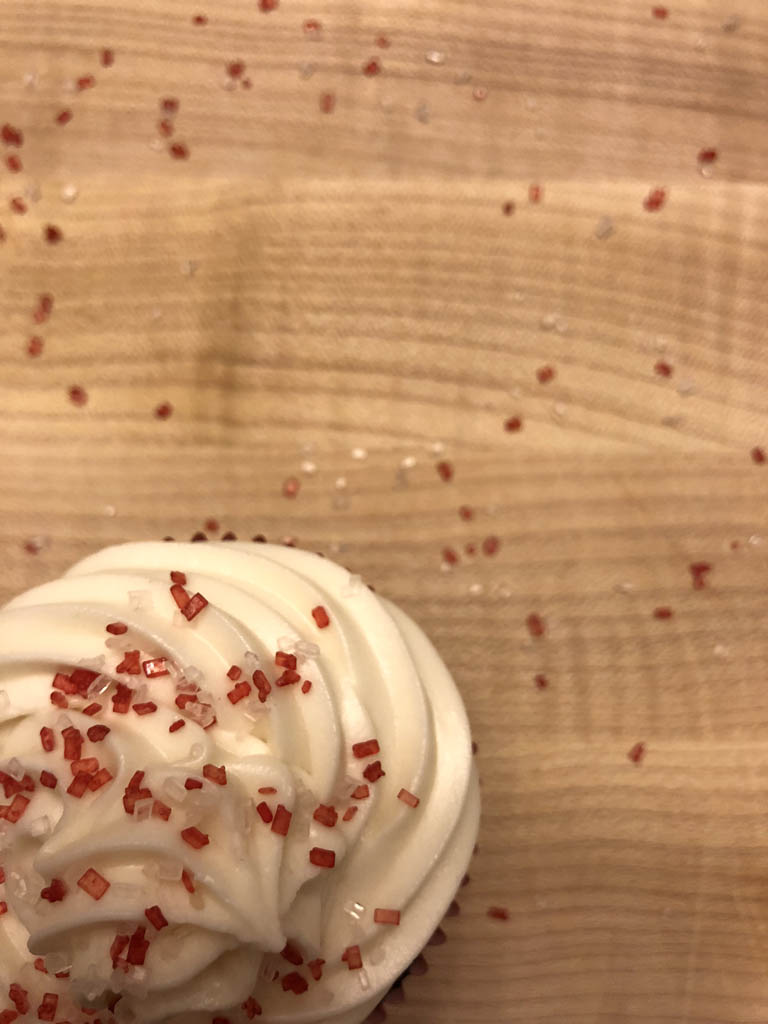
He also loves my cookies, but I kinda miss making cake, so that’s when I remembered that I have a cake mix cookie recipe I could use to make a big cookie cake out of it and add sprinkles and frosting! Only 4 ingredients are needed: cake mix of your choice, 2 eggs, unsweetened applesauce, and chocolate chips. I chose yellow cake mix for the cookie cake, and if you prefer, vegetable oil works in place of the applesauce. I just like using applesauce to eliminate the fat. A low-fat cake…sure, why not? And if you want to add the sprinkles, go ahead and include them as you mix the ingredients. Then for decoration I used the traditional buttercream frosting and piped the edges in purple (purple is used a lot for his band) and black for the letters. Yep, he turned 39!
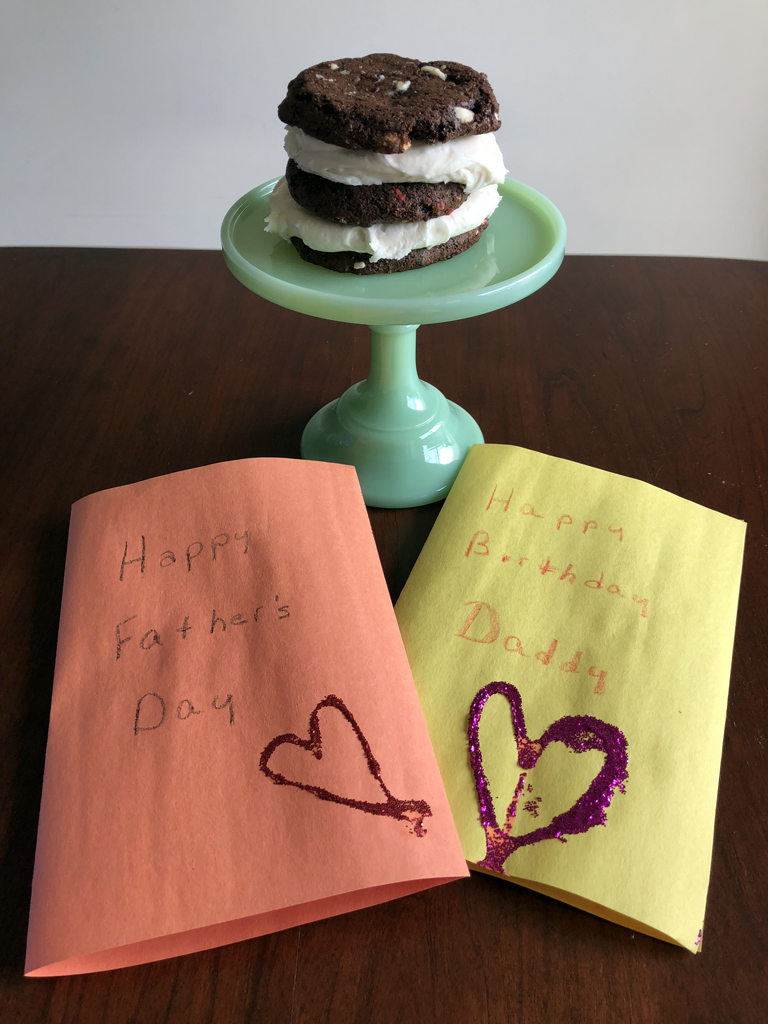
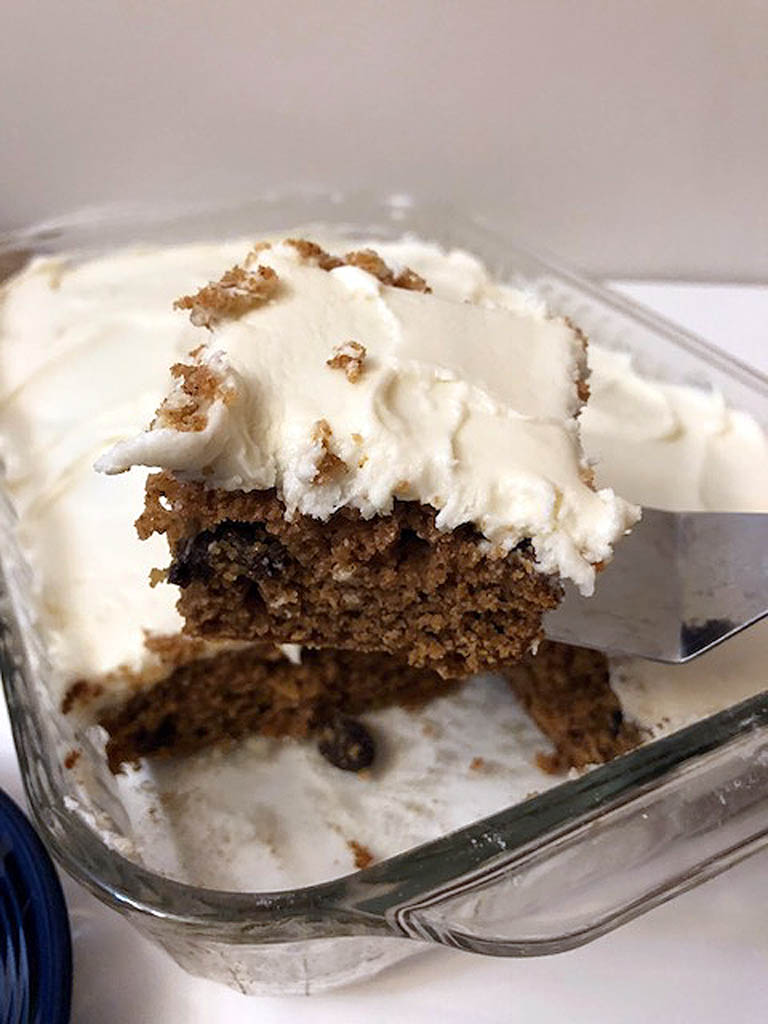
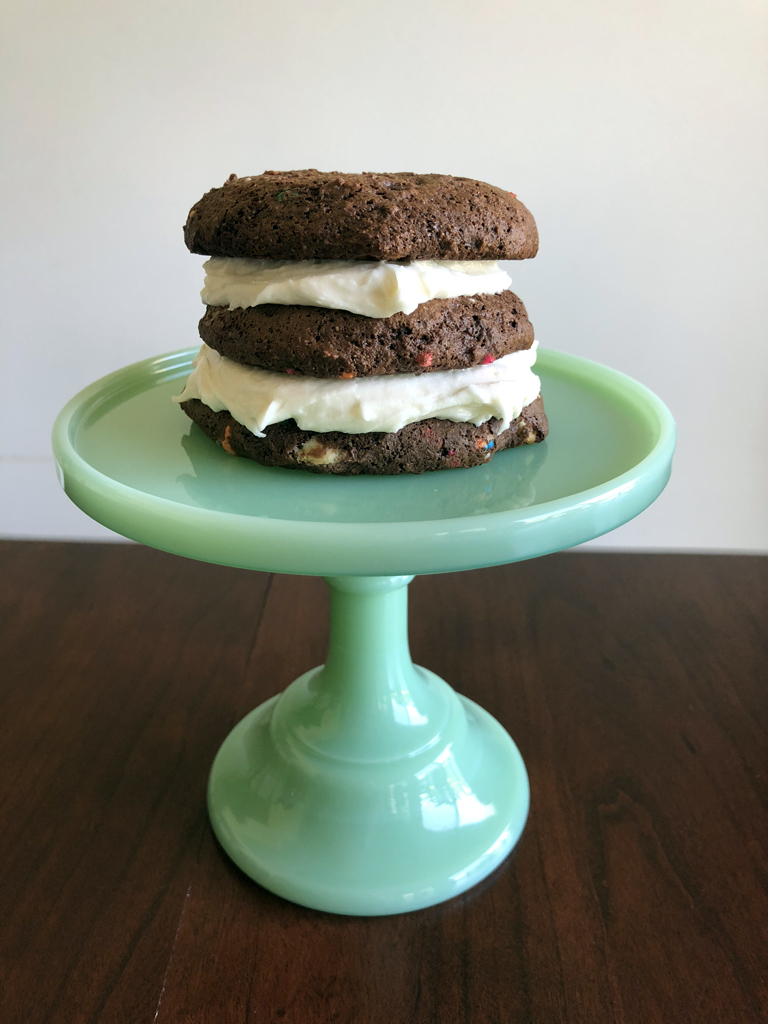
Since I had some frosting left over and a box of devil’s food cake mix, I made some large cookies, took 3 of them and stacked and frosted them like a small cake. I ended up making a couple of them. They were so cute that Alex wanted one for her birthday. Heck I’ll make individual cake mix cookie cakes for her guests when the time comes!
For someone who doesn’t eat birthday cake, I think you’d enjoy this kind of cake!

CAKE MIX COOKIE CAKE
1 box of cake mix of your choice (white, yellow, or devil’s food)
2 large eggs
½ cup of unsweetened applesauce (or vegetable oil)
1 package of semi-sweet chocolate chips
Rainbow sprinkles, optional
• Preheat oven to 350 degrees. Spray a round 14-inch pizza pan with non-stick cooking spray; set aside.
• In mixer bowl, combine all ingredients until blended.
• Scoop mix onto prepared pizza pan and with floured hands or a rubber spatula flattened out the dough until it reaches to the edge of the pan.
• Bake for 21-25 minutes until golden brown, and a toothpick inserted in the center of the cake comes out clean.
• Remove from oven and cool completely on a wire rack before decorating.
BUTTERCREAM FROSTING:
12 tablespoons softened margarine
1 bag (2 lbs.) of powdered sugar
2 teaspoons vanilla extract
4-5 tablespoons milk*
Mix all four ingredients together in a mixing bowl, starting out at low speed for about 20-30 seconds, then to medium speed for a couple minutes until it is a smooth consistency.
*If frosting is too dry and lumpy, carefully add more milk, 1 tablespoon at a time, until smooth.
HELPFUL HINT:
• Use disposable frosting bags with tips or a decorating tool to decorate your cookie cake.
• If creating a border, don’t frost all the way to the edge of the cookie cake. That way your fingers won’t get frosting on them while lifting up the pan. Start your border about 1/4-inch to 1/2-inch from the edge.
TO MAKE COOKIES:
• Use above ingredients for cookies, but use a large scoop to drop each cookie onto a greased or silicone mat-lined baking sheet. Bake cookies in a 350-degree oven for 13 minutes until golden. Cool completely on wire racks.
• To assemble the mini cakes: Place one cookie on a plate and spread a heaping tablespoon of frosting on top. Then stack a second cookie on top, lightly pressing down so frosting can be exposed at the edges. Frost the top of the second cookie, then repeat with a third cookie, pressing lightly. Frost the top of the third cookie, and finish your mini cake off with sprinkles if desired.
Advertisement

Deviled Eggs with Bacon

April was crazy!
Yes, we’re still unpacking, and then there was the neverending sinus crud, that nasty yellow jacket sting that made my left arm look like the size of my thighs, cleaning up after a sick cat, and keeping up with Alex’s school activities and commitments, I haven’t baked, cooked, or done anything in the new kitchen for a month-and-a-half, except Easter.  My family has been eating pizza and sandwiches more so than usual. I was beat.
But the good news out of all the chaos is that I finally accomplished something I’ve had in the back of my mind for a while, because I promised you guys I’d do it: those deviled eggs!
Since this is the first time making them, they’re easier than I thought! You boil the eggs, remove the shells (that part was quite tedious, like it was never going to end..LOL!), slice them in half, mix the yolks with flavorings and add-ins and you’re done! I used this basic recipe to help me get started. Instead of plain yellow mustard, I had some stone ground mustard that worked just as great.  Then I added the bacon bits along with the paprika. I also used my icing decorator to make them look fancier instead of using a spoon.
These deviled eggs are so good, I think I found my new favorite picnic food item to make besides  dirt.  Hopefully May will be a little nicer to me than April!
DEVILED EGGS
Adapted from Mary Nolan’s recipe on foodnetwork.com
1 dozen eggs
1/2 cup mayonnaise
2 teaspoons white vinegar
2 teaspoons stone ground mustard
1/8 teaspoon salt
1/8 teaspoon ground pepper
Paprika
Bacon Bits
• Fill the bottom of a large saucepan with about an inch of water. Place eggs in the water (eggs should be covered completely in water). Bring eggs to a boil, cover, and turn heat to low; cook for about 1 minute.
• Remove saucepan from heat and leave eggs in covered saucepan for 15 minutes. Then transfer eggs to a colander and rinse in cold running water for about a minute.
• Carefully crack egg shells; pat eggs dry with paper towels if needed.
• Slice each egg in half lengthwise and remove the yolks to a large bowl. Place egg whites on a platter.
• Mash yolks and then add remaining ingredients except for paprika and bacon bits. Scoop with a spoon or pipe yolk mixture with decorating tool into the egg whites. Sprinkle with paprika and bacon bits. Your deviled eggs are ready to serve, or cover and place in refrigerator until ready to serve.

Homemade Shamrock Shakes

Shamrocks shakes are all the rage in our house…our new house!
After a day of moving we ate at McDonald’s and Mike bought a large shamrock shake. Then the next day he did it again. Then the day after that….
Moving is hard work, so why not cool off with a minty shake that only comes around once a year!

Of course, you don’t have to wait a full year for the next round from McD’s. Just get the stuff and make one yourself!
I remember the very first time I made homemade shamrock shakes. I added mint extract and it was so strong that I cleared out our guests’ sinuses pretty good! I kept the mint extract out since I’m already using mint-flavored ice cream, but if you do want to clear your sinuses out or have a little more minty kick to your shake, use a drop or two; don’t go overboard with it!!  For a large shake, you can use about 3 drops.

What’s also great about making homemade shamrock shakes is you can take charge of portion sizes and you’ll know exactly what’s in your shake! You can go whole milk or skim milk or use low fat or regular mint ice cream. With these I went the low fat/skim route, along with a little bit of whipped cream and green sanding sugar in celebration of St. Patrick’s Day.

Shamrock shakes for days!! Now that’s something we can agree on!
Homemade Shamrock Shakes
1 carton of mint chocolate chip ice cream
1/2 gallon of milk
Whipped cream
Sanding sugar or sprinkles
• Scoop about 6 scoops of ice cream into a blender. Add 1 cup of milk.
• Cap the blender tightly, and mix until blended together.
• Divide between 2 small glasses and top with whipped cream and sanding sugar.
• Don’t forget the straws!
* 6 scoops makes enough for two small 12 oz. glasses. 8 scoops makes enough for one large 16 to 18 oz. glass.

Applesauce Cake

This weekend we close the door on one chapter and then open the door to the next.
We’re closing on the townhouse tomorrow!!!! Holy cow, it’s really happening!! We are packing and throwing out junk and just this past week I started packing up the kitchen. I wasn’t sure where to begin because I use everything and still need a lot of it out, but I gotta start somewhere, and Mike’s been asking me if I started packing up yet. Okay, okay, so I guess for a week we’ll have to live on processed food, but I had to bake one more thing in the kitchen, this applesauce cake.
It’s been a while since I made it. It was another one of those 13×9-inch baking dish cakes that my mom enjoyed making. There were so many other baking dish cakes she made, I should turn this into a series or something!
I think I mentioned this before, but I LOOOOOOOOOOVE applesauce! I use it in cookies and box cake mixes. What I love about using it as an ingredient is that it not only leaves your cakes moist, but it eliminates the use of oil, which is fattening, and I just don’t like using it in my desserts much. But anyway, this cake is another one of those quick baking dish cakes my mom made a lot of. Alex loves it, too! For her sake I omitted the nuts and added a little more raisins.
Celebratory cake? I think so. Here’s to a new chapter in my little family’s life in our new house!

APPLESAUCE CAKE
2 1/2 cups all purpose flour
2 cups sugar
1 1/2 teaspoon baking soda
1 1/2 teaspoon salt
3/4 teaspoon cinnamon
1/2 teaspoon allspice
1/2 teaspoon ground cloves
1/2 cup shortening
1/2 cup water
1 1/2 cups unsweetened applesauce
1 egg
1/2 cup chopped nuts*
1/2 cup raisins
• Preheat oven to 350 degrees. Grease and flour a 13×9-inch baking dish.
• In a mixer bowl, sift together flour, sugar and baking soda. Add the shortening and water. Beat for 1 minute.
• Add the applesauce and egg, and beat for 3 minutes. Then fold in the nuts and raisins.
• Pour batter into the prepared baking dish, and bake for 35-40 minutes. Cool and frost if desired.
*You can omit the nuts and throw in an extra 1/2 cup of raisins!

Salad Dressing Cupcakes

I’m currently on an 8-week weight loss challenge, but when your 5-year-old begs and pleas for cupcakes, the only way to keep her quiet is to just make the darn things and move on…without eating a single cupcake, and it’s hard!
Willpower is not in my vocabulary at all. Though I do practice it regularly, most of the time I fail miserably. With Lent being a few days away, I always remind myself of the times where I said I was going to give up chocolate or ice cream for 40 days and end up caving after the first week. So food isn’t something I can’t “give up” for Lent. This year it’s simply going to be reorganization. Reorganizing all the dreaded paperwork regarding the move, my dad, old bills, new bills, then the closet, Alex’s bookshelves, life in general…
I also used to rewrite most of my mother’s recipes to make her recipe boxes look a little neater and more organized, and for them to close shut. The smeared ink and rips from the worn-out index cards used to drive me mad.
The other day my brother asked about Mom’s salad dressing cake recipe. I found it, handwritten by me, of course.
About this salad dressing cake, it only has 7 ingredients, not including the frosting, and it’s also what Mom liked when it came to recipes: quick and simple. I kept the index card out in case I make it myself. The child wanted cupcakes, so I tried the recipe in cupcake form, with mayonnaise, because that was what I had in the fridge at the time.
Other things I did to the recipe: Instead of flour, I used cake flour. Cake flour makes your cakes and cupcakes fluffier, and doesn’t make them dry, which dry cakes/cupcakes are a problem I usually run into.
The recipe also calls for cold coffee.   Because we don’t have a coffee maker, we rarely drink the hot stuff anyway, so I usually steer clear from any recipe that requires it. Thank goodness for the refrigerated stuff! Recently Mike started up on Stok’s chocolate black coffee, so it’s a life-saver, even for him due to working nights and playing frontman for his band. Using black coffee with a chocolate flavor gave the cupcakes an even darker color and more chocolate to the taste.
But the star ingredient here is the mayo. If you have creamy salad dressing and no mayo, go for it! It works just as well. Once these cupcakes were cooled and frosted, peeling back the cupcake liner revealed how fluffy these things are, thanks to the cake flour.
Okay, okay, I did allow myself to have ONE to taste-test. Now to test my willpower all over again!

SALAD DRESSING CUPCAKES
Cupcakes:
2 cups cake flour
1 cup granulated sugar
4 tablespoons cocoa powder
2 teaspoons baking soda
1 cup creamy salad dressing (or mayonnaise)
1 cup chocolate-flavored cold black coffee
1 teaspoon vanilla extract
Frosting:
1 (32 oz.) bag powdered sugar
12 tablespoons (1 ½ sticks) softened margarine
3 tablespoons milk
1 ½ teaspoons vanilla extract
– Preheat the oven to 350 degrees. Line muffin pans with cupcake liners.
– In a mixing bowl with a whisk attachment, whisk together cake flour, sugar, cocoa powder and baking soda.
– Combine salad dressing, coffee and vanilla extract with dry ingredients. Mix together until blended.
– Fill each cupcake liner ½ to 2/3 full.
– Bake for 25-30 minutes, until toothpick inserted in a cupcake comes out clean.
– Remove from oven and allow cupcakes to cool in pans for 10 minutes before placing on wire racks to cool completely.
– For the frosting: Combine all 4 ingredients in a mixing bowl using a whisk or paddle attachment for about 3-4 minutes until frosting reaches a soft and smooth consistency. If frosting is mixing a little dry, add a little more milk.
– Frost cupcakes using a small offset spatula. Makes 21 cupcakes.