Now that I’m 40, I’m ready to tackle the year ahead, and the next decade.
I got a ton of things to do before I turn 50, because by then I may have to have knee replacement surgery or I just can’t walk anymore. Or it’s the fact that once I do hit 50, I’ll consider myself an old fart, so I got 10 years to hold on to my youthful self and do things I’ve not done yet.
For example, becoming an actual first-time home buyer.
This house buying thing makes me feel like a college student about ready to graduate. The “professors” give you “homework.” You have to do research, ask for assistance, research some more, fill your brain with knowledge, type out “essays”, sign and turn in everything before the due date, and pray for a good grade in order to graduate, which is your closing day. Oh, and you have to pay up to 20% down on your “student loan” right off the bat! Packing is another story. I definitely can relate to that Woody and Buzz Lightyear meme you see all over the interwebs: Moving boxes…moving boxes everywhere!!
Another example is to travel more, and further away from home.
The goal I want to pursue this year is the get our passports. I’d love to make plans to head to Montreal for some hockey action, because Mike is a Canadiens fan and he would love to see one of their home games. Plus for long-term vacay planning, visiting Europe, because I gotta go now before I get too old to walk 10 miles and complain about it. I’ll have to prepare my body to fast for a month prior to a trip to Italy or Germany because the food looks so amazeballs, I will more than likely come home 30 pounds heavier!!
Last example, cook/bake things I normally don’t cook/bake.
I must start broadening my horizons and scope out recipes I’ve always wanted to try but never got around to them, or just forgot about them. And then there are things I have never in my entire life have made, like deviled eggs. Yes, you read that right! I’m 40 years old, and never once made deviled eggs! I think I’ll jot deviled eggs down as one recipe I’ll post for Easter.
Pepperoni rolls are also something I never make, except that one time I made them after we moved into our house 15 years ago. I’m from WV and I only made these tasty state delicacies only one time?!?! I fixed that problem by making them for Alex’s 5th birthday party, and every single one of them were gone within 5 minutes! Feeling more confident, I made them again for you all!
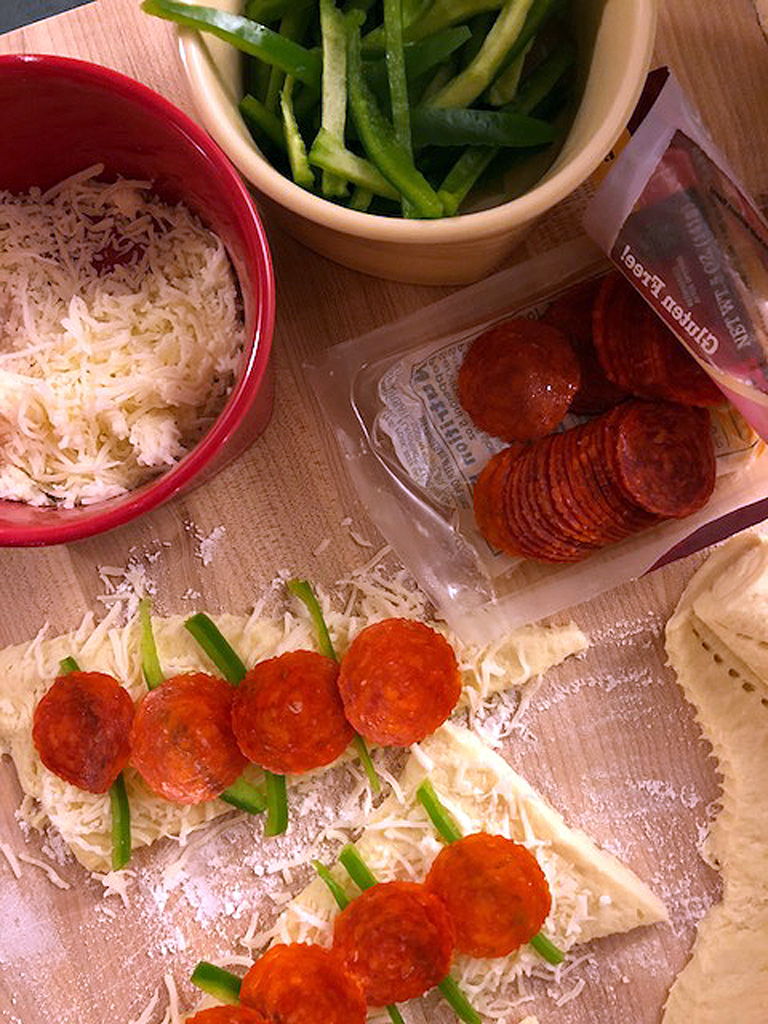
The pepperoni roll was first sold just down the road from me, in Fairmont, WV, and it made a great snack/lunch for the coal miners. They’re like little rolled up pizzas, but without the tomato sauce. I bought a few tubes of jumbo-sized crescent rolls, sprinkled shredded mozzarella cheese on them, added 3-4 pepperoni slices, and rolled them up. When making these with the crescent rolls, follow the package directions for baking times, but I left them in the oven for a couple minutes longer until they browned just a little. If you can’t find jumbo-sized crescent rolls, the regular-sized ones work just as well. For another batch I added small green pepper slices to them for added color and sprinkled Italian seasoning on top. My brother gave me hell for doing this..LOL! I’m also currently working on the perfect dough for these, so keep watch on this space for another post once I finally get it to work out!
If this is your first time making them, I highly recommend giving them a shot. The Super Bowl is coming up, and they are one of the best finger foods to have on hand for your party, or any party! Make them, and I’m sure they will go quick!
PEPPERONI ROLLS
1 tube (12 oz.) jumbo crescent rolls
1 package (8 oz.) of shredded mozzarella cheese (or any flavor cheese you desire. I also used Italian blend.)
1 package (6 oz.) of pepperoni slices
1 green bell pepper, sliced thin (optional)
2 T of melted margarine
2 T of Italian seasoning (optional)
• Preheat oven to 350 degrees.
• Open up the crescent roll tube and separate each triangular piece out on a lightly floured surface.
• Sprinkle the mozzarella cheese over each triangular piece, about 1/4 cup each, more or less if you choose.
• Place 2 or 3 pepper slices over top of the cheese on each triangular dough, if desired, and then place 3 or 4 slices of pepperoni on each.
• Carefully roll up the dough and place on an ungreased baking sheet or stone.
• Using a pastry brush, lightly brush the melted margarine over the top of each roll. Sprinkle a little Italian seasoning over top each roll, if desired.
• Bake in the oven for 15 minutes or until the rolls are a golden brown.
• Remove from oven and transfer rolls onto cooling racks to cool slightly.
• Serve warm or cooled.
• For storage, there is no need to refrigerate. Just place the extras in a ziplock bag or in a storage container.
Hey all! How was your Christmas? Was Santa Claus good to you? Did you eat tons of ham? I’m sure you devoured some good dessert too!
With New Year’s oh-so close and a lot of you are probably thinking about your dieting strategies, I’m squeezing in this last post of 2017 because I want to get these festive pretzels in to ring in 2018 as a little indulgence! They are amazing and addicting! These things are a guilty pleasure of mine and for a lot of friends and family who love them too.
My mom made these a lot around the holidays. She discovered them at some party she attended years ago, and loved the idea so much that she started making them herself. They were a hit among friends and family members, and then I jumped on the festive pretzels bandwagon.
Chocolate or white chocolate, either flavor, they’re great! The M&Ms are like the icing on the cake. When I purchase a bag of mini pretzels I always make sure I find the bag that looks like it has the most salt. The sweet and saltiness flavor makes these easy-to-make candies a delight to devour!
I make these for holiday parties, birthday parties, as wedding favors, and I even mailed them to Germany. If you want to bring everyone in the world together, make festive pretzels!
While making this year’s batch I wanted to try something different. I thought about doing a double-decker version. I also added other toppings: holiday sprinkles, more M&Ms, sanding sugar to add a little sparkle. My taste buds love me! For nut lovers, I’m sure chopped walnuts or peanuts would be good as toppings too!
You can use either wax paper or silicone mats to place your pretzels on. Individually place each pretzel down on the wax paper or mat. Then melt your chocolate according to the package directions. I mostly use chocolate or white chocolate almond bark, so I cut two blocks, place them in a microwave-safe bowl, and melt for 55 seconds. I’ve been doing these things for years so I stopped stirring the chocolate in between. Just keep an eye on the chocolate as you melt it if you’re not comfortable with letting the chocolate melt for a certain amount of time like I do. If you find little chunks in your chocolate, you kept it in the microwave too long. It’s happened to me a bunch of times, and that’s where you learn to know an approximate melting time with your microwave without burning your chocolate. If there are not many little chunks you can still use it.
Once all stirred and melted, take a spoon and drop a small dollop of chocolate right on top of each pretzel. Then take 3 M&Ms and place each one in a pretzel hole. No need to press them too much into the chocolate. They’ll settle in nicely.
Now the hard part: waiting until the chocolate sets completely. Once set, you can place them in a bowl and share them with your guests, or you can place them in cute decorative containers to give as gifts.
For the double-decker ones, right after adding the chocolate on your first pretzel, place another pretzel right on top and then add another dollop of chocolate on top of it. You can use the same chocolate or switch to the white chocolate. You can also make these really colorful by using the melting chocolate from your local craft store. Then add the M&Ms or other desired topping.
So there you go! Easy-peasy! I hope you all have a wonderful, safe and prosperous new year, and I can’t wait to share with you even more fantastic goodies in 2018!!
For the past two months we’ve been searching high and low for a house. We’ve come real close with a couple of them, but it didn’t work out for us. Technically being first-time home buyers, this process is much longer than we anticipated, because we’ve never dealt with this before (we live in a double-wide, and that process only took us a month!)! Anyway, moving on, and hopefully sometime by next spring or summer we’ll be in something new, or new-ish.
But for now, let’s discuss something more light-hearted and melt-in-your-mouth delicious. I have a huge obsession for peppermint patties. If I’m stopping by the local grocery store during my lunch break I usually pick up one peppermint patty and eat it on my way back to work. But sometimes if I’m really needing a peppermint patty fix I’ll buy the bite-size ones. OMG….I want one right now, pronto!!!
With my peppermint patty obsession you’d think I’d make homemade ones a lot, but I actually don’t. In fact, I only made them 3 times in my life! Hard to believe huh?
They’re very easy to make, but sometimes they can get a little messy. Making the peppermint creme filling is like making frosting but without the milk, and you use peppermint extract instead of vanilla extract. The key to getting a much firmer creme filling and a better grasp at them is to wrap it in plastic wrap and allow it to chill for a couple hours or more. For my first batch I left the creme filling sit in the fridge for 2 days because I didn’t have enough time to make them right away, but the filling was firm and wasn’t dry. After 5 days the filling does begin to dry out though, so if you want to make the filling ahead of time, you can leave it in the fridge for no more than 3-4 days.
I cut off a section at a time, then cut off small pieces and roll in my hands to create a ball. Then I flatten each ball a little bit and place on wax paper until they’re dipped into the melted chocolate. I place one creme ball into the chocolate and cover it up with a spoon. Then I take my candy scoop and scoop it out of the chocolate and place on wax paper to completely set. Now you don’t want to leave the creme balls in the warm chocolate very long or they’ll begin to get real soft and may melt, so be quick. Once they’re set you can store in a container on your counter top or give them away in cute treat bags.
Since this may be my last post of the year, I wish all of you a very Merry Christmas and I’ll be back in 2018 with more sweets and other fun stuff!!
FESTIVE PEPPERMINT MELTS
1 package (2 lbs.) powdered sugar
1 cup (2 sticks) softened margarine
2 ½ teaspoons peppermint extract
Melting chocolate, any color you prefer
Sprinkles, optional
– With hand mixer, combine powdered sugar, margarine and peppermint extract in a large bowl. The cream filling will look like coarse meal at first, but it’ll stick together.
– Once cream filling is mixed, scoop out onto a long piece of plastic wrap. Roll up the filling with the plastic wrap, flattening it out a little as you wrap it.
– Place in the refrigerator for 2 hours or until cream filling is firm to the touch. You can leave the filling in the fridge for no longer than 3 days, or it will begin to dry out.
– When ready to make your melts, unwrap the filling and slice a piece of it lengthwise. Cut small pieces one at a time, and roll each piece into a ball with your hands. Flatten the ball of cream in your hands and place on parchment or wax paper. Continue this process with the rest of your filling, or you can make so many patties at a time if you’d like; place leftover filling in the fridge until it’s time to make more again.
– Follow the melting directions on the back of the melting chocolate package. Once chocolate is melted, place one cream patty into the chocolate. Using a spoon, cover the patty with chocolate. Then with a fork or candy scooping tool, remove the patty out of the chocolate and place back on parchment or wax paper. Use sprinkles for garnish if you’d like. Allow to set complete before placing into containers for storage.
For those who know Mike and I well we’ve been a couple for almost 23 years. OMG we’re old!!
To make the really, really long story short, way back in the 80’s my brother’s childhood friend is one of Mike’s cousins who used to live up the hill from where we lived. They grew up together, were in the same Boy Scout troop, and became Eagle Scouts together. Then came along his wedding a couple hours from home, and that’s where our story began….
Some redhead dude with a bowl cut, pierced ear, wearing a green silk shirt and black tie (it was the early 90s, peeps!) showed up and BOOM! 6 months later we started dating. How did he get my phone number in the first place? I never asked, because I just knew one of his cousins gave it to him!
Fast-forward through high school and art school to Valentine’s Day 1999. Since we were poor college students we decided to have dinner at his house. I made my mother’s lasagna, along with store-bought garlic bread and a bottle of wine. We feasted and then began watching Sleeping Beauty. He asked if I wanted a glass of wine…
A ring was in the glass of wine, and I cried uncontrollably for 5 minutes until a tiny “Yes” came out of my mouth. I’ve been a fan of wine ever since.
Fast-forward again 3 years later, on this day in 2002, we made it official. We already felt like an old married couple before we became an old married couple! 15 years and 1 kid and 2 cats later, here we are, still in the same town in the same house, but soon that’ll change too.
We’ll start our search for a new home soon, but one thing may be different…it MIGHT be in the same town, but we will still be close to family, friends and the band.
Now about this lasagna, it’s Mike’s favorite meal, and mine too, because it’s so delicious and so easy to make. It’s the meal I made on the day he proposed to me. It’s the meal my mother made a good bit, but I changed things up to Mike’s specifications: absolutely no cottage cheese!! He prefers ricotta cheese. Mom always made lasagna with cottage cheese in it, and growing up I always saw it as a normal ingredient you put in lasagna. As I got older I learned that the reason why Mom put cottage cheese in her lasagna and never ricotta is simply because she was trying to save money. But if you want to go the cottage cheese route, it’s just as yummy!
When I make lasagna I buy double of mostly everything, especially the cheeses since we’re cheese worshippers, and for fear that I run out of it and it doesn’t spread out all the way to both sides of the baking dish. And you can do more than 2 layers, too! This particular lasagna I managed to get it to 4 layers without running out of anything!! **Giving myself a pat on the back**
This recipe is not written down on an index card; I had to consult my memory bank for this one. It comes from the many many years of making it and watching my mom make it, and as time goes by, it’s become one of Mike’s favorite meals besides steak and German food. It’s a super-simple dish, and along with a side salad and garlic bread, it’ll fill your belly with satisfaction. It’s a meal full of fond memories of our lives together.
So here’s to my husband (raising a glass of red wine). The skater boy, the artist, the horror punk rocker, lover of hockey and all things Halloween. He not only made the past 20+ years being his girlfriend and wife awesome, but the past 4 years seeing him as a daddy, he’s the best, fun-loving father a daughter could ever have.
I love you, Mike, and here’s to another 15+ more years of lasagna!
LASAGNA
1 lb. ground beef (or turkey)
1 medium-sized onion, chopped
1 medium green pepper, chopped
3 cloves of garlic, chopped
2-3 large white mushrooms, chopped
28 oz. can of crushed tomatoes
1/4 cup granulated sugar
1 tablespoon Italian Seasoning*
1 box of lasagna noodles
2- 16 oz. packages of shredded mozzarella cheese
32 oz. container of ricotta cheese
Grated Parmesan cheese for garnish
• Drizzle a little bit of olive oil onto the bottom of a large skillet. Break up and brown the ground beef; cook until meat is no longer pink. Drain oil if needed. Add garlic, vegetables, sprinkle a little bit of salt to enhance the flavors, and cook on low for about 5-10 minutes.
• Meanwhile in a medium saucepan, pour in the crushed tomatoes and stir in the sugar. The sugar is to lessen the bitter taste of the sauce. Add in the Italian seasoning, cover, and cook on low heat until heated through. Then mix in the ground beef with your sauce.
• To prep the lasagna: In a 9×13 baking dish, drizzle a little bit of sauce on the bottom of the dish and then add a layer of uncooked lasagna noodles. I don’t layer the noodles; I lay three noodles side-by-side, and then lay part of one across one end of the dish to fill the gap. Next pour a little bit of sauce over top of the noodles; spread sauce evenly. Next, spread a little bit of the ricotta cheese over top the sauce, then sprinkle mozzarella cheese, then sprinkle some Parmesan. Start the second layer by placing the noodles over top the cheese; repeat layers until you no longer have any more cheese (Be sure to save some mozzarella for the very top of your lasagna!).
• Cover dish with aluminum foil and bake in a preheated 350-degree oven for 1 hour until the noodles are softened and cheese is melted.
• Let lasagna cool down and stop bubbling for a few minutes before serving.
*If you don’t have Italian seasoning, you can create your own combination of herbs. I’d use oregano, basil, parsley, and thyme, and mix them together. Make enough to create a tablespoon, or more if you prefer.
The piles of paperwork were signed, the piles of money were handed out, and it’s a done deal – SOLD! My childhood home was passed on to some really nice people who are willing to take good care of it and call it home.
Now it’s our turn.
We’ve been browsing around online, driving to houses of interest, including to ones out of town and out of state. Once all the Halloween festivities are over and Mike’s band schedule opens up we’ll begin the search. Our days in the little shoebox on the hill are finally numbered!
With all the craziness going on in this past month I managed to bake something that made the house smell super-duper and fall-like. These apple spice cookies give a little more excitement to the regular oatmeal raisin cookie, and they’re a little healthier alternative from all the pre-Halloween candy that’s being eaten at my house and at work. When Mom made these cookies she used unsweetened applesauce, but this time I wanted the taste of apple pieces in them, so I thought I’d give apple pie filling a try. I poured the filling into a strainer, smashed the apples to smaller chunks, and drained a little bit of the filling just so the dough wouldn’t be too runny. It’s an extra step, but it’s worth doing!
APPLE SPICE COOKIES
3/4 cup (1 1/2 cups) margarine, softened
1 1/2 cups granulated sugar
2 eggs
1 teaspoons vanilla extract
3 cups all purpose flour
2 1/4 teaspoon baking powder
1/2 tablespoon ground cinnamon
1/2 teaspoon ground cloves
3/4 teaspoon ground nutmeg
1 1/2 cups apple pie filling (or unsweetened applesauce*)
2 cups raisins
2 1/4 cups oatmeal
Preheat oven to 375 degrees. Grease baking sheets or use silicone mats.
To prep the apple pie filling: Using a large bowl, place a strainer inside the bowl or lay it on top of the bowl. Pour the pie filling into the strainer, and with the back of a spoon, press down on the apples to break them apart and to allow some of the filling to strain out into the bowl. Measure about 1 1/2 cups into a smaller bowl and set aside. Disregard the extra pie filling.
In a mixer bowl, beat margarine and sugar until creamy.
Mix in eggs and vanilla extract
In a large bowl, mix together flour, baking powder and spices, then gradually stir into wet ingredients.
Stir in the apple pie filling, raisins and oatmeal.
Using a small spoon or scoop, drop dough onto prepared baking sheets.
Bake 13-15 minutes until edges are slightly golden.
Allow to cool completely on wire racks.
*If using unsweetened applesauce, skip the apple pie filling step and pour the applesauce in the wet ingredients with the raisins and oatmeal.