Laborless Labor Day Brownies

Howdy!  I hope everyone is having a great Labor Day weekend!
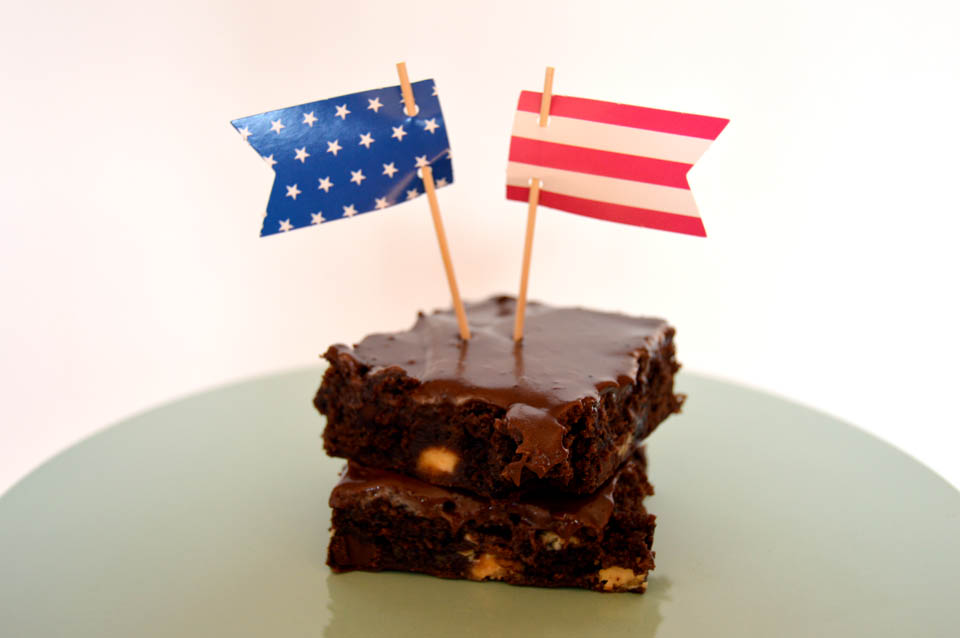
This is one of those last-minute holiday weekend dessert recipes that is easy and effortless, so you don’t have to labor too much in your kitchen if you’re in charge of dessert making at your picnic today.  It’s a bounce-off-the-walls kinda brownie since there’s a good bit of chocolate in it, so if your child wants one, feed him or her a small slice…LOL!
Now I’m gonna go sneak in a piece of brownie and run it off by chasing my kid around the house, then crash and enjoy the rest of the day off.
Enjoy!! XOXO
LABORLESS LABOR DAY BROWNIES
1 cup (2 sticks) softened margarine
3 oz. of cream cheese, softened
2 cups granulated sugar
3 eggs
1 teaspoon vanilla extract
1 cup all-purpose flour
¾ cup cocoa powder
½ teaspoon salt
½ teaspoon baking powder
10 oz. pkg. (1 2/3 cups) semi-sweet chocolate chip morsels*
Chocolate Frosting:
3 tablespoons softened margarine
3 tablespoons cocoa powder
1 1/3 cups powdered sugar
¾ teaspoon vanilla
1 tablespoons milk
*Preheat oven to 325 degrees, and grease the bottom and sides of a 9×13-inch baking dish with a non-stick cooking spray.
* In a mixer bowl, beat margarine, cream cheese and sugar until fluffy.
* Beat in the eggs and vanilla.
* In a separate bowl, sift together the flour, cocoa powder, salt and baking powder.
* Gradually add flour mixture to the wet ingredients until blended. Stir in the chocolate chips.
* Spread brownie batter into the prepared baking dish, and bake for 35-40 minutes until the brownie begins to pull away from the sides of the pan. Also be sure you test the center of the brownie with a toothpick. If it‘s too moist, put it back in the oven for another 5 minutes until the center sets up a little more.
* Let the brownie cool completely in the pan before frosting.
* For the frosting: In a small mixer bowl, beat margarine and cocoa powder until blended. Gradually add the powdered sugar and  vanilla. Add the milk, beating to spreading consistency. Spread frosting all over the top of your brownie, and cut to serve.


Chocolate Zucchini Bread

Recently I’ve been seeing many of my friends posting photos of their summer veggies straight out of their gardens. Beautiful, colorful pictures of tomatoes, peppers, zucchinis, lettuce, herbs, and other ready-to-be-picked vegetables makes me so excited, and so impatient, about starting a garden myself. For 15 years I’ve been itching to start a raised garden. The neighborhood I live in prohibits such things. I could start tomato plants in pots, but I don’t want to do that. I’m so OCD about how I want to do things with my future garden that I’m saying NO to planting things in large pots and allowing them to take over my front porch.
Alex and I bought an herb kit and unfortunately was unsuccessful. We’ve had so much rain, and there was nowhere for the water to go in those little metal pots that 2 of the 4 herbs got waterlogged and were limping along. The other 2 herbs never sprouted. I even tried planting a new herb in one of the tiny pots and it too never made it. So the lesson here is never buy a $20 herb kit with fake dirt that expands in water, and most likely the seeds are either no good or don’t work well in tiny pots.
So again, I continue to wait for my raised garden.
My cousin was really successful with her zucchinis this year. Holy moly they were HUGE!! I picked this one to take home and chop up. I could probably make 10 zucchini recipes out of this thing!! The first recipe that comes to mind is the good ol’ zucchini bread. Mom always made a great zucchini bread, with walnuts, but I obviously had to add chocolate to it, after hearing about a zucchini/chocolate cake my mother-in-law was telling me about. I had to try it as bread first.
With the help of cocoa powder, this bread turned out great. Chocolatey, zucchini-y, and moist. I made two, but I’m sure I could make 20 out of this giant zucchini!
CHOCOLATE ZUCCHINI BREAD
3 eggs
2 cups sugar
1 cup melted margarine
1 teaspoon vanilla extract
1 teaspoon ground cinnamon
1 teaspoon salt
1 teaspoon baking soda
¼ teaspoon baking powder
2 cups grated zucchini
3 cups sifted flour
2/3 cup cocoa powder
1 cup mini semi-sweet chocolate chips
½ cups chopped walnuts (optional)
Grease and lightly dust the insides of 2 bread pans using a non-stick cooking spray and cocoa powder.
In a mixer bowl, whisk 3 eggs until they become foamy.
Mix in sugar, margarine, vanilla, cinnamon, salt, and zucchini.
In a separate bowl, combine the flour, baking soda, baking powder and cocoa powder. Gradually fold into wet ingredients. Then add in the chocolate chips and walnuts.*
Divide batter between bread pans, and bake for 1 hour.
Remove bread from the oven and allow to cool in the pans for about 10 minutes before inverting to cool completely.
*Of course, nuts are always optional! If you like to have walnuts, but others in your family don’t, you can pour half of the batter in one bread pan, mix the nuts into the rest of the batter, then pour into the second bread pan.

Chicken Salad Sandwiches

Hi there!
How’s your summer going?
So far it’s been a little eventful: A trip to Long Island, the tot’s first vacation away from mommy and daddy (it was a loooooong week without her!), swim lessons, preschool preparations, still trying to sell a house and keeping it tidy, catching up on the cleaning, baking, trying out new stuff…It’s never-ending!!
I’ve started this “diet” plan last month, and after I got back from NY it fell through, but I needed to do it anyway. Salads everyday for lunch. Every. Day. No snacking in between; just water. If I had carbs in the morning, that was it for the day. Then it was protein for dinner along with some fruit. Did it work? Yep! I lost a few pounds in the process! The hard part was cutting out the sugary stuff some, and let me tell ya, it was HARD!! It’s true what the experts say, that a sugar addiction is the same as having a drug addiction…yikes!!! So, um…with me getting closer and closer to 4-0 it did dawn on me that maybe I do need to cut back on the sweets a bit and that I can’t eat like I did when I was 25, but I refuse to give up my love for baking!! I’m willing to share the goodies to friends and coworkers so there’s less of it for me. The big challenge will occur starting in September when I try again with my holiday baking and resisting from eating all the goodies. Now that I will not have any unexpected phone calls or unfortunate family events happening (pray that I don’t again!!), I’ll be able to get my mixer going in high gear!

But anyway, back to eating healthy….
I started going to this really neat salad/sandwich place in town because I had coupons, and one of the coupons was for a free sandwich. I went for the chicken salad sandwich and it was good, except it wasn’t very big. I paid nothing for it, but it didn’t look like a $9 sandwich to me! Just my opinion, but again, great sandwich, but on the small, expensive side.
No, I didn’t call the restaurant to complain; I’m not that type of a person. It even had candied pecans in it, which I normally wouldn’t go for, but it gave the sandwich a nice, sweetness to it. And the bread was like a rye bread, which is the type of bread my parents craved, especially when it came to reubens. Yum yum!!!
So while eating it I decided to create a copycat version of it with a little bit more stuffing. It has some steps to it, but it makes it worthwhile!

First off, the bread. The local grocery store offers lots and lots of awesome breads. I went for a flax and fiber bread, because it looked pretty with all the little seeds in it and I need fiber in my life. But you be the judge and decide what kind of bread you’d prefer for your sandwich. You can either toast your bread in the skillet with a little bit of margarine for an added crunch or leave it as is.

Next is the stuffing: I used thin slices of cooked boneless/skinless chicken breast, lightly drizzled some olive oil, sprinkled on some garlic and herb rub, and cooked them in my grill pan. Once finished, I chopped them up in small chunks. While cooking the meat, I chopped up some grape tomatoes and celery. Once the chicken was chopped, I put the ingredients in a bowl mixed with mayo. I kinda overdid on the mayo, but I wasn’t complaining; I like mayo! And if you end up not using all the chicken, throw it in a salad!

Finally, assembly time! Top it off with spring mix lettuce and candied pecans (directions below). If you can’t eat pecans, no worries; just leave ’em out. I did mention a while back that you won’t see too many nuts in my recipes, but there are a few exceptions. In most cases you can omit them. A good substitute for the pecans is dried cranberries to keep that added sweetness. They were on the sandwich I ate, but I left them out of this one.
And there you have it! This recipe makes enough for 2 or 3 more sandwiches, depending on how much stuffing you put in it. Because there was so much stuff in the sandwiches, I made them last longer throughout the week and only ate half of one along with some fruit for my lunches. And better yet, it was free, too!
CHICKEN SALAD SANDWICHES
6 slices of specialty bread (wheat, seeded, whatever you prefer)
3/4 cup of mayonnaise (I used the mayo with olive oil in it)
1 pack of thinly-sliced, boneless, skinless chicken breast
Olive oil
Garlic and herb rub*
1 celery stalk
5-6 grape tomatoes, chopped
1/2 cup of chopped pecans
2 tablespoons margarine
2 tablespoons dark brown sugar
• For the chicken, drizzle some olive oil into a grill pan or large skillet. On medium-high heat, place chicken into the skillet, and drizzle the tops with a little olive oil, and sprinkle on garlic herb rub. Cook for a few minutes, then turn chicken over and sprinkle with seasoning. Cook both sides until browned and no longer pink, about 5-6 minutes each side. Transfer chicken onto a plate to let cool for a few minutes, then chop it up in small chunks.
• For the pecans, chop your pecans to smaller pieces, set aside. In a small skillet, melt margarine and then add the pecans. Add the brown sugar and stir, allowing pecans to cook for 5 minutes or less. Once done, place candied pecans into a small bowl and let them sit. The brown sugar will set up as the pecans cool and you can break apart when ready to assemble sandwiches.**
• Chop celery and tomatoes into small chunks and set aside. In a small bowl, add the mayo, celery, tomatoes, and chicken; mix together.
• To assemble, place one slice of bread on a plate. Spoon on as much mayo mixture as you like. Next, place a few spring mix lettuce leaves and sprinkle on a few candied pecan pieces right on top. Place the other slice of bread on, and cut the sandwich down the middle. Enjoy!
*If you don’t have any garlic and herb rub, you can mix together about 3 cloves of chopped up garlic, chopped fresh basil and rosemary. Rub it on the chicken, then place in the skillet.
**I had candied pecans left, so I placed the bowl in the fridge. You can refrigerate them for a faster setting or just leave them on the countertop while you prep. You can leave the pecans in the fridge throughout the week if you want to add more to your sandwiches.

Butterscotch Cookies

Flashing back to somewhere in the late 80’s and 90’s my mother would make butterscotch cookies for my dad; he totally loved them. The really sweet, buttery taste of the butterscotch morsels, the crunchiness, and the oatmeal did him in. Mom never had a recipe written down. She always used the recipe on the back of the package, whether it was from a brand-name or not. Just about every time she made them, the end result was about the same: very flat, and I mean as-thin-as-paper flat, and they would break apart so easily. Her response was the same too…why are they coming out like this? At the time, who cares? They were good anyway! If Dad approved of them, so be it! Even I made them like that for a while up until I got married; I too followed the recipe on the back of the butterscotch chip bag.
Not anymore!

I’m so over flat, break-apart-so-easily butterscotch cookies! These ones are a little thicker, and they’re not that crunchy either.  This recipe is slightly adapted from the old Hershey’s recipe book I received as a gift and it saved me from flat butterscotch cookies.  More flour pretty much did the trick, and I added cloves along with the cinnamon for a little earthy touch to the taste.
But they still can come apart though, that’s if you don’t wait a minute to remove them from your baking sheet once they come out of the oven. Just like a lot of cookies, it’s wise to let them sit for a minute before removing from the baking sheet; they may fall apart since they’re so hot and not completely set, like this poor cookie!

I made these a couple times as gifts for Dad, but this year for Father’s Day I made them in honor of him, now that it’s been over 4 months since his death.
Mom is probably making these for him in their heavenly kitchen.

BUTTERSCOTCH COOKIES

1 ½ sticks of margarine, softened
¾ cups granulated sugar
¾ cups dark brown sugar
2 eggs
1 teaspoon vanilla extract
1 ¾ cups flour
1 teaspoon baking soda
1 teaspoon ground cinnamon
½ teaspoon ground cloves
3 cups old-fashioned rolled oats
1 package butterscotch morsels
1 package white chocolate morsels
– Preheat oven to 375 degrees. Lightly spray cookies sheets with non-stick cooking spray or line with silicone mats.
– In mixing bowl, mix together margarine and sugars until light and fluffy.
– Add eggs and vanilla extract; mix well.
– In a large bowl, mix together flour, baking soda, and spices. Gradually fold flour mixture and oats into the wet ingredients. Fold in morsels.
– Using a medium-sized cookie scoop, drop cookie dough onto cookie sheets and bake for 12 minutes until lightly golden.
– Remove cookies from oven and let them sit on the cookie sheets for a minute to allow them to set. Remove from cookie sheets and allow cookies to cool completely on wire racks.

Vegetable Gyros

Hey everyone!  It’s been a while, but I’ve been working and sweating my tail off at my dad’s house and trying to spruce up ours at the same time.  And work’s been pretty busy, and then there’s preschool stuff, and swim lesson sign-ups, and more shows for Mike’s band, and……
**deep breath**
But out of all the craziness that’s been going on in my life, I can finally say that dad’s house will finally…FINALLY…be on the market this week!!  This is only the beginning of the big process of selling a house, buying a house, and selling another house (ours).
**deep breath**
But there’s still our long weekend trip to Long Island.  I’m super-excited!!!  I hope we have great weather, and we’re going to Luna Park!!!!!  My bucket list is going to have several check-offs that weekend!!  It’s going to be much-deserved for the both of us; after all that we both been through the past year, this trip is going to be worth the wait!
And since I’ll be wearing a bathing suit on vacay and it’s getting hot outside, it’s time we take a breather from all the baking and the Easter candy fallout and make veggie gyros!
**deep breath**
Mike and I enjoy going to the local Mediterranean cafe on lunch dates and eat gyros (Greek pronunciation: [ˈʝiros], or “heros”).  I’m all about wraps of any kind really!  They’re a quick lunch or a small dinner that you can easily prepare yourself.  It beats having the same old bologna and cheese on plain bread.

What I did here is kind of a copycat version of Taziki’s grilled veggie gyro, but the veggies were sautéed.  It still has the yellow squash, tomatoes and zucchini in it, but I added a little more color to it (the orange bell pepper instead of a red one), and I whipped up a simple dressing that is also great for salads.  I guess you can pretty much say it’s a homemade pesto aioli dressing.  For assembly, I used the Flatout Foldit wraps and whole wheat flour tortillas.  Either one is good, but I’m no super-expert at wrapping food, so don’t judge..LOL!  You can also add some grilled chicken strips in there too, or throw in a different kind of cheese.

You can’t go wrong with these gyros, and eating one won’t make you feel guilty if you need to fit into a bathing suit soon!
**deep breath**


Vegetable Gyros
Copycat of Taziki’s Grilled Veggie Gyro
1 small zucchini, slice into thin long slices and cut in half
1 small yellow squash, chopped into small slices
2 roma tomatoes, chopped; remove centers
1 orange bell pepper, chopped into small slices
1 small red onion, cut into small, thin slices
2 cloves garlic, minced
Feta cheese, for garnish
1 package of flour tortillas
For the Dressing:
1/4 cup olive oil
1/4 red wine vinegar
1/2 – 1 Tablespoon Italian seasoning
• Slice up all your vegetables and place in a bowl; set aside.
• In a medium bowl, combine all the dressing ingredients; set aside.
• Drizzle a medium skillet with olive oil, enough to cover the bottom of the skillet.  Add the onion and cook for a couple minutes, then add the garlic; cook for a minute.
• Add the sliced vegetables into the skillet and let cook until they get soft, about 8-10 minutes.  Add a little more olive oil, if needed, to prevent the veggies from sticking to the skillet.
• Once vegetables are done, remove from heat and pour into the dressing and toss.  Let cool for a moment.
• To assemble, place a small amount of vegetables in the center of each wrap and fold both sides, meeting in the center.  Wrap one side of gyro with wax paper or foil to handle.  To take with you, simply wrap the entire gyro with foil.  Makes about 4 or 5 gyros.  Don’t forget the napkins! 🙂