Apple Coffee Cake

   AppleCoffee5 Those crisp, cool mornings are making a comeback.  Yep, fall is here, but I can’t complain.  This summer girl is excited about the change in season, even if my sinuses are driving me crazy!!  The transition into fall is such a wonderful feeling, especially when you live in a state surrounded by hills and you get to experience the beautiful fall foliage and wear zip-up hoodies, watch football and go to fall festivals and……
Okay, enough rambling…LOL!  But the one thing I do love about this time of year is the apples.  The taste is refreshing, then mix it with some cinnamon…yeah, life is good!

AppleCoffee6

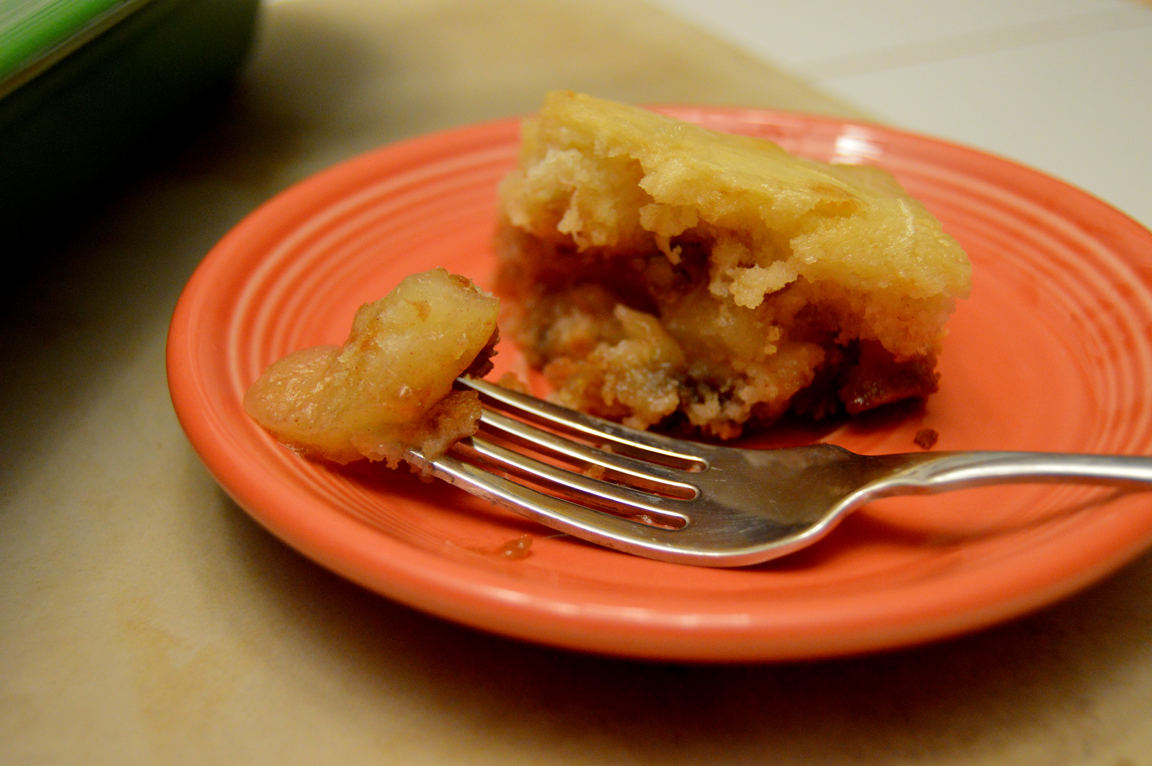
So I’ve been fishing through my mom’s recipe box and found an apple cake that tastes good when it’s warm.  It has the word coffee in the name, but there’s no coffee in it.  It can be paired with your cup of joe, but don’t ask me about that part; I don’t drink the stuff, so I drink it with milk.

AppleCoffee3

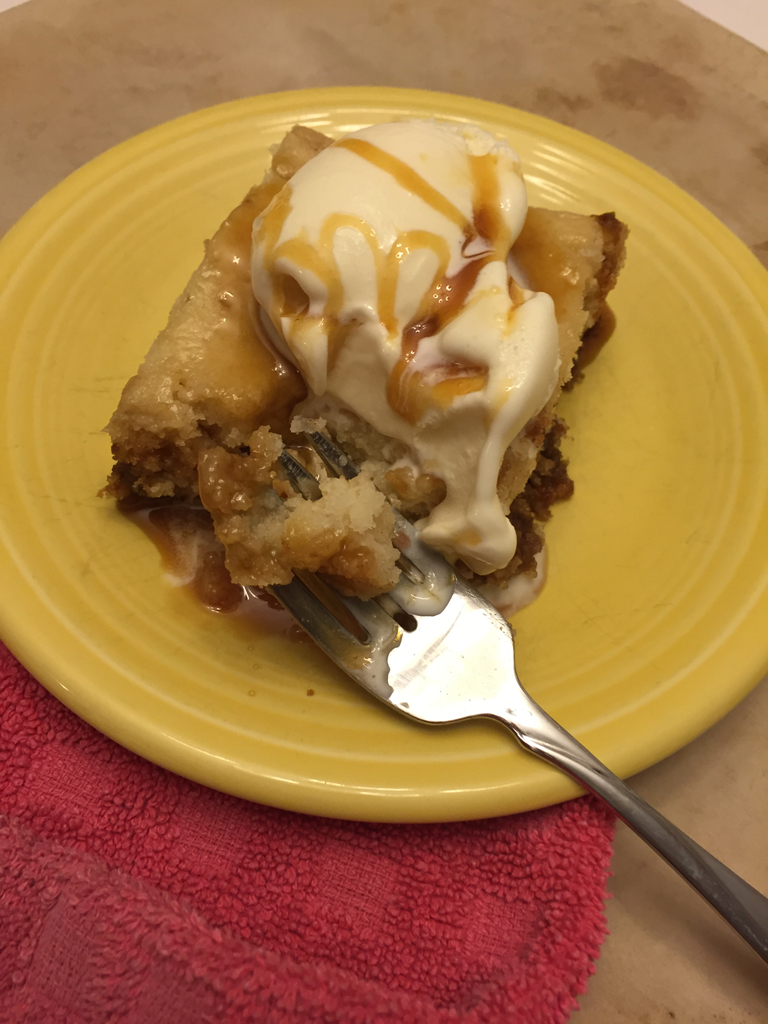
I absolutely love this cake because there’s apples in it, it’s warm, and it’s cake, and best of all, it’s perfect for breakfast, or for any time of day!   Another good way to enjoy this cake is top it with a scoop of vanilla ice cream and drizzle it with caramel…yeah, now we’re talking!!

AppleCoffee2AppleCoffee1

So grab some apples and some coffee….or whatever drink you prefer….and sink your teeth into this fall favorite!!
Happy baking, and happy fall!


APPLE COFFEE CAKE
1 (20 oz.) can apple pie filling
2 teaspoons cinnamon
3 cups flour
1 cup sugar
1 1/2 cups milk
1/2 cup softened margarine
3 teaspoons baking powder
1 teaspoon salt
3 eggs
1/4 cup packed brown sugar, or a little more if needed
1/4 cup coarsely chopped nuts
2 tablespoons melted margarine
GLAZE:
3/4 cup powdered sugar
1 tablespoon melted margarine
3/4 teaspoon vanilla extract
2-3 teaspoons hot water


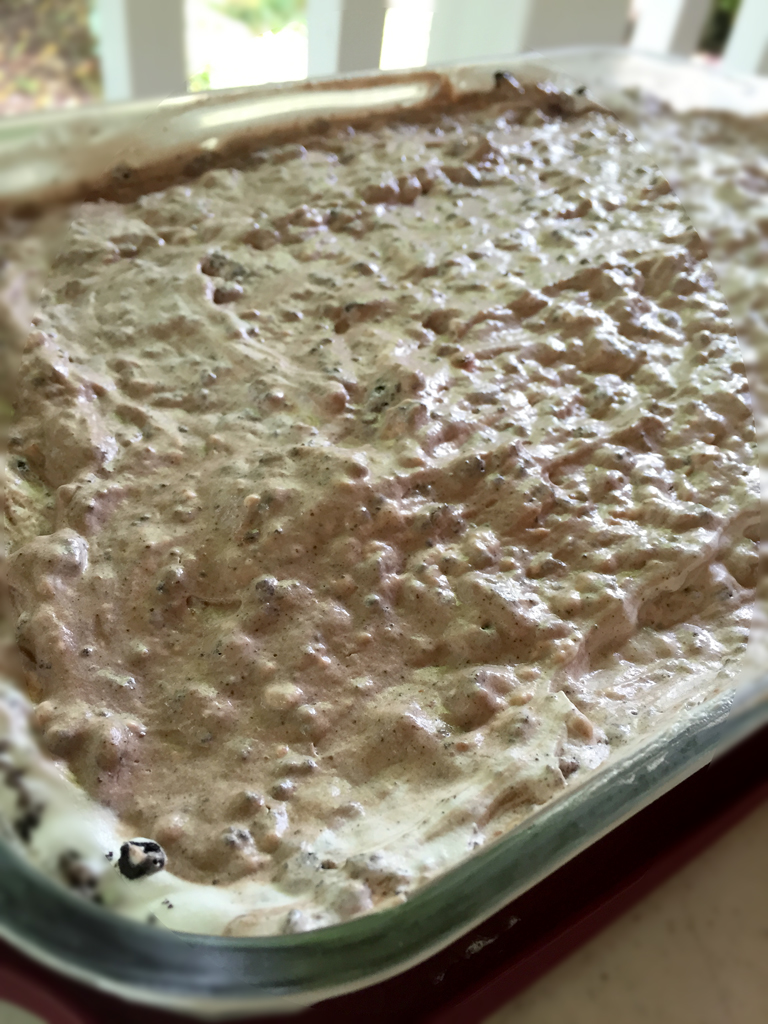
  1. Preheat oven to 350 degrees.  Grease a 9×13-inch pan.
  2. In a medium-sized bowl, mix pie filling and cinnamon; set aside.
  3. In a large mixer bowl, beat flour, sugar, milk, margarine, baking powder, salt, and eggs on low speed, scraping the bowl often; beat for 30 seconds, then continue to beat for 2 minutes on medium speed.
  4. Pour half of the cake batter into the prepared pan.  Spoon in the pie filling, then sprinkle the brown sugar and nuts over top; drizzle with the melted margarine.  Then pour the rest of the batter over top of the apples.
  5. Bake for 45-55 minutes until a toothpick inserted in the center comes out clean.
For the glaze: Mix ingredients together, and drizzle all over the cake 20 minutes after it’s baked.
• Serve cake warm with a scoop of vanilla ice cream topped with caramel syrup.

Toddler Trail Mix and White Chocolate-Pretzel Mix

 TotMix2TotMix1The beach is calling for me!!!!!
I don’t know why we planned our beach trip to be so late in the summer.  Maybe it’s because it’ll give me a little extra time to burn off all those cookie calories so I can squeeze into the bathing suit, or maybe so Mother Nature can get her act together and make it hot outside for a change!  Finally we’re at 90 degrees…I need to be near water…NOW!!  I do know one reason why we wait is that all the kiddies will be back in school and it’ll be less crowded.  Good for me and good for the tot with her most recent I-can’t-deal-with-crowds phase.
Speaking of the tot, she’s going through this crazy growth spurt, too.  She drinks a gallon of milk within 2 days, all the crackers are gone in a day, all the grapes are gone the moment I open the bag, and she’s still going crazy over those yogurt bites that taste weird, at least to me!  Freeze-dried yogurt pieces…I’ll pass, but whatever floats that girly’s boat, she still loves yogurt bites.
I’ve been making this trail mix with bunny graham crackers and raisins since she started eating solids. I’d have them handy for her while sitting in church, on road trips and for a little snack when she’s oh-so desperate for food, like, 10 minutes before dinner, because she’s a toddler, and toddlers don’t wait for anything.  She loves her trail mix, and that’s what matters most!
TotMix4 TotMix3
And of course, I’m going to share this super-quick and easy trail mix, which I hope your little kiddies will enjoy too!
TODDLER TRAIL MIX
1 box Bunny-shaped graham crackers (I buy Annie’s Friends Bunny Grahams)
1 package of Gerber yogurt bites (any flavor; I usually buy mixed berry)
6 oz. raisins
• Mix three ingredients together, either in a bowl, or shake up in a zip-lock bag, and it’s ready!  Easy-peasy!!  Just fill up your child-friendly containers and baggies and you’re set to go!
Don’t leave yet!!  There’s more!
 PretzelMix1 PretzelMix2
Mommies and daddies, or anyone for that matter,  have to munch on something too!!  I experienced a chocolate bark/people chow-like mixture at work that was so good that I had to duplicate it, or at least make something similar!!  NOTE: If you want to include chopped peanuts instead of the almonds, or use both, that’s up to you.  I have a peanut allergy so I left them out.

PretzelMix3 PretzelMix4

WHITE CHOCOLATE-PRETZEL-NUT MIX
1 bag of mini pretzels, crushed into large sized pieces
2 packages of semi-sweet chocolate chip morsels
1 package of almond bark (blocks of white chocolate)
1 package of chopped almonds (or chopped peanuts)
6 oz. raisins
Nice helping of rainbow sprinkles (or jimmies….whatever you call them!)
• Place a large piece of wax paper or silicone mat on a large cookie sheet.
• Place the pretzels in a gallon-size zip-lock bag, and crush with a rolling pin.  You want large chunks.  Spread pretzels out on the cookie sheet.
• Next, spread out 1 package of chocolate chips, almonds, and raisins.
• Melt the almond bark in a microwave-safe bowl for about 1 minute and 10 seconds, careful not to burn it.  Stir it, and place back in the microwave for a few more seconds if needed until it’s all melted.  Pour the melted almond bark evenly over the pretzel mixture.  Do the same for the other bag of chocolate chips.  I used the same bowl as the almond bark, and melt in the microwave for about a minute until all melted.  Spread evenly over top the mixture.  Gently mix ingredients with a wooden spoon to help the melted chocolate go through the mixture.  Immediately top with sprinkles so it’ll stick to the melted chocolate.  Place the mix in the refrigerator for a few hours to harden, and then carefully break apart into pieces.
Enjoy!

White Chip Chocolate Cookies

WhiteChipChocThis cookie has been my Facebook cover photo for a while. I look at it and think, ‘I need to make those again!’ Plus I’m still on this Oreo cookie kick, too!  I’ve been buying quite a few packs of Oreos for the past month, and not a single one ended up in the cookie jar; they all went into a dessert for some special occasion…and into a lot of bellies.
WhiteChipChoc2But the Oreos in these cookies did end up in the cookie jar, but in crumble form.  They are absolutely delicious, and you can’t have just one!  This is a recipe I changed up from the one my mom used.  Mom’s recipe just had white chocolate chips and the cocoa powder, and they were made like reversed chocolate chip cookies; I just added in more stuff…lots of it…to liven it up!  They only survived 2 days in my house.  Yes, 2 days!  My husband was raiding the cookie jar every couple of hours, and so was I!  The tot loves them too, but I only give her about 5 broken cookie pieces as a dessert.  No way am I going to give her a whole cookie overloaded with chocolate after 6:00pm!  I want her (and me!!) to sleep!!
It’s a lot of chocolate with a little bit of a crunch.  But be warned, you’ll be going back to your cookie jar again and again, and you too will agree that you can’t have just one!
WhiteChipChoc3 WhiteChipChoc4Wow!!!  It’s nice to see a lot of people liking my Facebook page!!  I just want to say thank you from the bottom of my heart for your love and support. This encourages me greatly to keep this blog going and making it reach to new heights, and I do hope you all will come back again and again to see and try out what I’ve come up with!  Don’t forget to follow me on Instagram and Pinterest, too!  The links are to the right at the top of the page.  Spread the word…and eat a cookie while you’re at it!!
White Chip Chocolate Cookies
Ingredients:

2 cups all-purpose flour
1 cup cocoa powder
1 teaspoon baking soda
1 cup (2 sticks) margarine, softened
¾ cup granulated sugar
2/3 cup dark brown sugar
1 teaspoon vanilla extract
2 eggs
1 cup white chocolate chips
1 cup dark chocolate chips
1 cup crushed Oreo cookies
Directions
:
Preheat the oven to 350 degrees.
Crush the Oreos by using a food processor, or place them in a gallon-size zip-lock bag and crush with a rolling pin. Set the crushed cookies aside.
Mix the margarine and sugars together in a stand mixer until smooth and creamy. Fold in the eggs, one at a time. Add the vanilla extract; mix well.
For the dry ingredients, mix flour, cocoa powder, and baking soda together, then gradually add to the wet ingredients; mix well. Fold in the white chocolate chips, dark chocolate chips, and the Oreos.
Drop by teaspoonfuls using a spoon or a small cookie scoop.
Bake for 10-12 minutes, depending on the size of your cookies.
Makes about 3-4 dozen, depending on the size of your cookies.

Sour Cream Cookies

BabyOwls1 BabyOwls3
Yes, I’m still alive.
It’s been a rough month since we are in the middle of potty training the tot, and I’ve been losing sleep and baking time due to her becoming afraid of the evil shadows lurking in her bedroom late at night. And amongst all the lack of slumber and the weekends full of family get-togethers, the lack of exercise, and nonstop go-go-go, I’ve been beat. And once again, my butt’s been hitting the couch almost every night…Zzzzzzzzzzz
But in spite of all the late-night shadow-slaying and soiled training pants, I did manage to squeeze in some baking time. I recently made sour cream cookies for a baby shower, and a couple others just to reduce some stress and satisfy my taste buds.   The sour cream cookies are a hit with a lot of my friends and family. I no longer make them specifically for holidays. I’m making them almost monthly!

MamaOwls1 MamaOwls2 MamaOwls5 MamaOwls8

Back in the day, for 5 holidays out of the year, my mom would bake a bunch of cute, shaped sour cream cookies, spread frosting on them and top them with sprinkles or a piece of candy. When I asked to decorate the cookies, she took to the sidelines and let my imagination run wild. My best creations were always the Christmas cookies. I used 5 or 6 cookie cutters and maybe 5 or 6 pounds of frosting in all different colors and put in a lot of time and detail. The best part of it all is the frosting. I’m addicted to frosting! Give me a plain cookie and I’ll dip it in a bowl of frosting and chow down! Heck, just give me a large spoon and I’ll eat the frosting like it was applesauce! Not good for the hips, but buttercream is the best ever!
A couple years ago I entered into the world of royal frosting, which takes a little longer to decorate than buttercream, and I’ve been using decorating tips instead of store-bought tubes of frosting where you screw tips on them and start decorating, or carefully detail with butter knives. Yes, butter knives! Royal frosting is more time-consuming, but makes you more detail-oriented, which is a good thing. One of these days I’m going to go back to the buttercream/butter knife/store-bought frosting tubes option for old time’s sake. Maybe for the Christmas cookies!
Here are a few more cookies I’ve created recently…

BonesPaws (6) Caps Chicks PaintPalettes1

Happy baking!
XOXO!


SOUR CREAM COOKIES

2 sticks of margarine, softened
1 1/2 cups granulated sugar
2 eggs
1 teaspoon vanilla extract
1/2 teaspoon almond extract
4 1/4 cups flour
1 teaspoon baking powder
1 teaspoon salt
1 teaspoon baking soda
4 ounces sour cream (low fat works well, too)
1) Beat margarine and sugar in a large mixing bowl at medium speed until light and fluffy.  Add the eggs, vanilla and almond extracts until well blended.
2) In a large bowl, sift flour, baking powder, salt, and baking soda.
3) Gradually mix the dry ingredients with the wet ingredients while gradually adding the sour cream, until well blended.  Chill the dough for 2 hours.*
4) Roll dough out onto a floured surface, a small amount at a time, to about 1/4-inch thickness.  Cut with desired cookie cutter, and carefully place onto a cookie sheet (One of the pictures above I poked holes into my dough with a fork in hopes it’ll keep the cookies flat while they bake…didn’t work much.  Hey, it was worth a shot!).
5) Bake at 350-degrees for 10-12 minutes until the bottoms of the cookies are a light golden brown.  Cool completely on wire racks and decorate!**
*If not needing to use the dough right away, you can chill it for 24 to 48 hours.
**The cookies freeze nicely, but only before frosting them.  The longest I had them in the freezer was 3 months.  I usually don’t do it, but you can freeze decorated cookies, but I seriously recommend placing wax paper on each layer to help prevent your cookies from sticking to each other.

Dirt

Dirt1 Dirt2
Once or twice a year, my mother would make Dirt for family picnics or holidays.  Everyone in the family looks forward to it, especially me, because it is a dream come true….Oreos, chocolate, Cool Whip, and pudding mixed together to make such a heavenly, fulfilling dessert, I could roll in it….well, maybe not, but even if it’s so filling that my stomach can’t take anymore after the second serving.

Dirt4 Dirt5

Then later in the day I’ll go for a third or fourth, then I feel uncomfortable.  Yeah, I don’t know why I torture myself like this, but it’s so addicting you have to go back for more!!
I hope you enjoy it as much as I do.  Oh!  And when you do scoop some onto your plate, drizzle some chocolate syrup on top, or add some gummy worms for the kiddies!  Have fun with it!
Happy baking!


DIRT
1 package of Oreo cookies, crushed (Original or the double-stuffed)*
1 stick of margarine, melted
2 containers (8 oz. each) whipped topping, thawed
1 package (8 oz.) cream cheese, room temperature
1 package (4-serving size) instant vanilla pudding
1 package (4-serving size) instant chocolate pudding
3 cups milk
Crush 1 package of cookies in a food processor, or place them in a gallon-size zip-lock bag and crush with a rolling pin.  Pour crushed cookies into a 9×13-inch baking pan.  Melt the margarine, and pour over the cookies; stir together until evenly distributed, then press down to the sides of the pan.
In a large bowl, mix together the cream cheese and 1 container of whipped topping until smooth.  Pour the mixture over the crushed cookie crust.
In another large bowl, mix both instant puddings and milk.  Stir constantly until it begins to thicken.  Pour pudding mixture over the cream cheese mixture.
Spread the other container of whipped topping over top of the pudding mixture.  Sprinkle the rest of the crushed cookies on top.
*Since the size of the Oreo packages have gotten smaller these days, you may need to buy 2 packs, or buy one family-sized pack.  You want enough cookies to fill the bottom of the pan as well as have a nice amount to sprinkle on top.
**You can either keep the dessert in layers or you can blend everything together.  It tastes just as good!